Just installed the first step tonight. I am generally really happy with it though I did manage to drill through a portion of an underlying rivet in the vertical baggage rib. Looking at the pitch of the rib rivets and the porch of the step rivets it seems that it would be rather difficult to not do that. I am confident that it is more than strong enough as we are effectively riveting a square steel plate to the structure.
What I'm curious about its if any of you encountered the same thing?
Step install
-
Spike
- Chief Rivet Banger
- Posts: 4013
- Joined: Thu Oct 14, 2004 8:40 pm
- Location: Baltimore, MD
- Contact:
Step install
http://www.rivetbangers.com - Now integrating web and mail!
Current Build: 2 years into a beautiful little girl
Current Build: 2 years into a beautiful little girl

-
Spike
- Chief Rivet Banger
- Posts: 4013
- Joined: Thu Oct 14, 2004 8:40 pm
- Location: Baltimore, MD
- Contact:
Ill check out your site. As for pictures I will have to grab some this evening.
Spike
Spike
http://www.rivetbangers.com - Now integrating web and mail!
Current Build: 2 years into a beautiful little girl
Current Build: 2 years into a beautiful little girl
-
Spike
- Chief Rivet Banger
- Posts: 4013
- Joined: Thu Oct 14, 2004 8:40 pm
- Location: Baltimore, MD
- Contact:
Here, I found a great shot on Bret's site:
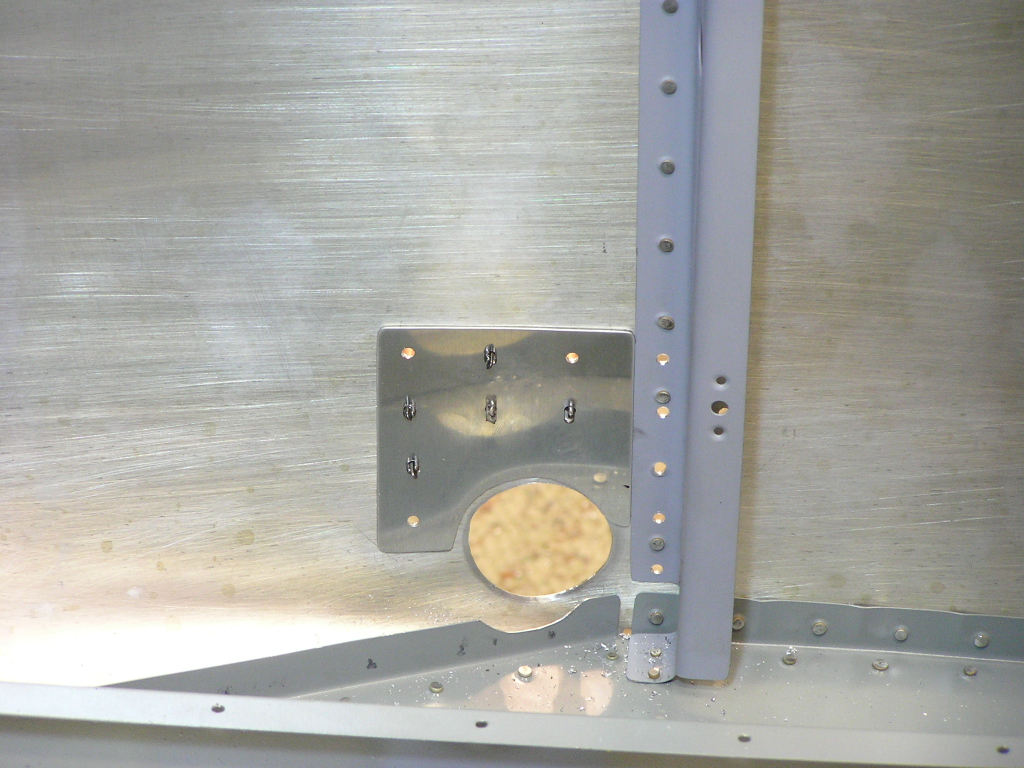
I managed to drill through a portion of one of the rivets of the vertical baggage rib. I was wondering if anyone else had done this. Though it looks like it is possible to avoid it as can be seen here. Actually it looks like he took one out and might possible have enlarged the hole a bit.
On your site it looks like you threw out Van's measurement call outs on that row of rivets and changed their pitch as necessary to keep that from happening. I sure wish Van's wouldn't make you decide which route to go between contradictory drawings, text, or engineering.
*ugggh*
http://www.rivetbangers.com - Now integrating web and mail!
Current Build: 2 years into a beautiful little girl
Current Build: 2 years into a beautiful little girl
Yeah, I know what you mean. Now I see what you're talking about.
I remember I looked at this area carefully before drilling those holes and realized that some of them would come very close to the installed rivets. The instructions that come with the steps do tell you that this column of rivets can be adjusted a bit. So you're right, I drilled out those rivets first, then backdrilled through those holes through the step plate and enlarged them to #30. It looks like Bret did the same thing. A couple of rivets were relocated slightly to avoid being too close to an existing rivet. If you look close at my rivet pattern, you can see it but it worked out well.
I think there should be some mention in the fuselage plans to leave a few of those holes empty, for those who are installing steps.
I like what Bret did with the addition of a doubler inside the fuselage skin. I wish I had done that.

Just one of the many areas in the construction process where you have to sit back and decide how to proceed. My main thought was that I was going to be replacing the -3 rivets with -4's for the step plate so drilling out one was not a big deal.
I decided on the doubler plate after hearing other builders talk about how the stress of a 200+ pound person would cause the step to flex at the plate. I also countersunk the plate for flush rivets as opposed to using the round-head rivets called out in the plans.
I also applied Proseal between the step plate and the outer skin in order to minimize any water penetration. It also strengthens the bond with the outer skin in addition to the rivets. In other words, that sucker ain't going anywhere.
Spike, you can see my process here...http://www.flightinnovations.com/fusela ... ml#8/24/07
Bret Smith
9A Flying (N16BL)
Blue Ridge, GA
http://www.FlightInnovations.com
APRS Tracking: http://www.flightinnovations.com/tracking.html
9A Flying (N16BL)
Blue Ridge, GA
http://www.FlightInnovations.com
APRS Tracking: http://www.flightinnovations.com/tracking.html
-
Spike
- Chief Rivet Banger
- Posts: 4013
- Joined: Thu Oct 14, 2004 8:40 pm
- Location: Baltimore, MD
- Contact:
I mimicked Bret on my second step. The first step I am just going to live with my punched rivet. Its only one rivet and the whole area has been reinforced with a plate.
I was a bit frustrated at myself for blindly accepting Van's dimensions in the horizontal plane. I knew better. Oh well, time to keep moving on.
Spike
I was a bit frustrated at myself for blindly accepting Van's dimensions in the horizontal plane. I knew better. Oh well, time to keep moving on.
Spike
http://www.rivetbangers.com - Now integrating web and mail!
Current Build: 2 years into a beautiful little girl
Current Build: 2 years into a beautiful little girl
-
JOHN TIPTON
- Class E
- Posts: 92
- Joined: Thu Jun 08, 2006 4:46 pm
- Location: Torquay England
Step install
Hi Guys
Has anyone had their steps 'powder-coated' - I thought this would be a nice touch, expecially with the expected 'scruffing' that might occur with usage with painted steps
John (Rv-9a - wings)
Has anyone had their steps 'powder-coated' - I thought this would be a nice touch, expecially with the expected 'scruffing' that might occur with usage with painted steps
John (Rv-9a - wings)
-
Spike
- Chief Rivet Banger
- Posts: 4013
- Joined: Thu Oct 14, 2004 8:40 pm
- Location: Baltimore, MD
- Contact:
Step install
I am seriously considering it.
Sent via DROID on Verizon Wireless
-----Original message-----
Sent via DROID on Verizon Wireless
-----Original message-----
Submitted via emailFrom: RB Lists - General Construction <support@rivetbangers.com>
To: generalconstruction@rivetbangers.com
Sent: Tue, Aug 31, 2010 10:10:44 GMT+00:00
Subject: Step install
Hi Guys Has anyone had their steps 'powder-coated' - I thought this would be a nice touch, expecially with the expected 'scruffing' that might occur with usage with painted steps John (Rv-9a - wings) rivetbangers.com - Discussion topic http://www.rivetbangers.com/forums/viewtopic.php?p=34877#34877
Also - before doing the final install on the steps - consider annealling them to prevent cracking.
Many builders have reported cracks at the weld on the steps where the airfoil-shaped bar is welded to the flat plate that rivets onto the fuselage. Take a standard propane torch and heat this area to a nice dull red, then let it air cool. This will remove the stresses from the welding process and make it less likely to crack later.
Many builders have reported cracks at the weld on the steps where the airfoil-shaped bar is welded to the flat plate that rivets onto the fuselage. Take a standard propane torch and heat this area to a nice dull red, then let it air cool. This will remove the stresses from the welding process and make it less likely to crack later.
Greg Niehues
Midland, TX
RV9A - finishing - 90% done, 90% to go
http://websites.expercraft.com/airguy/
Building a 9A with too much fuel and too much engine - should drop dead any minute now.
Midland, TX
RV9A - finishing - 90% done, 90% to go
http://websites.expercraft.com/airguy/
Building a 9A with too much fuel and too much engine - should drop dead any minute now.
Wish I had known that before I installed mine. I guess I'll just have to wait and see if they last.airguy wrote:Also - before doing the final install on the steps - consider annealling them to prevent cracking.
Many builders have reported cracks at the weld on the steps where the airfoil-shaped bar is welded to the flat plate that rivets onto the fuselage. Take a standard propane torch and heat this area to a nice dull red, then let it air cool. This will remove the stresses from the welding process and make it less likely to crack later.
-
Lycosaurus

- Class G
- Posts: 34
- Joined: Sat Sep 08, 2007 9:54 am
- Location: Ottawa, Canada
Whacking at metal ...
I just had my passenger step re-welded due to a crack. I believe that the crack was caused by the brutal bending of the rear lip of the step flat plate (rear most, to conform to fuselage).
I saw the work of an expert builder in our area, and he just cuts the offending piece of metal off. No cracks found yet.
I would cut off the excess piece, or follow the recommendation to anneal after having bent/whacked that area into shape.
I saw the work of an expert builder in our area, and he just cuts the offending piece of metal off. No cracks found yet.
I would cut off the excess piece, or follow the recommendation to anneal after having bent/whacked that area into shape.
Alfio
RV-9A, first flight Dec. 18, 2008
TT (tach) over 800 hrs.
Ottawa, Canada
RV-9A, first flight Dec. 18, 2008
TT (tach) over 800 hrs.
Ottawa, Canada
-
Spike
- Chief Rivet Banger
- Posts: 4013
- Joined: Thu Oct 14, 2004 8:40 pm
- Location: Baltimore, MD
- Contact:
As a follow up, I dropped my steps off this morning for powder coat. I have talked to another local builder who did it and it seems to work out well. Ill post some pics when I get them back.
Spike
Spike
http://www.rivetbangers.com - Now integrating web and mail!
Current Build: 2 years into a beautiful little girl
Current Build: 2 years into a beautiful little girl