Page 1 of 1
Flap Bracket Question
Posted: Thu Apr 26, 2007 5:09 am
by smittysrv
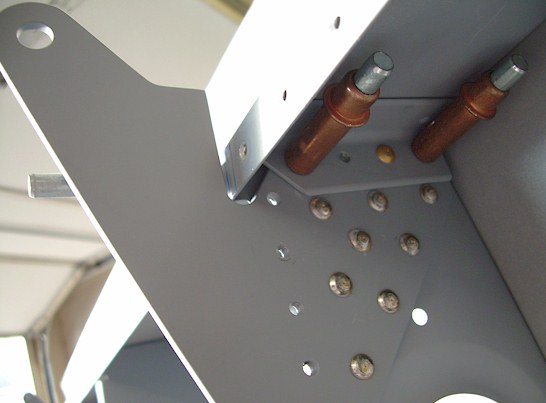
I'm trying to rivet the top angle piece on to the flap bracket and rib and my offset rivet set and rivet gun won't fit between the ribs for the center flap bracket. What did yous guys do?
Posted: Thu Apr 26, 2007 6:32 am
by tshort
Do you have a single offset rivet set? That leaves the gun at an angle and is good for spots like that.
The -8 is a little different so I haven't tried that exact area, but it looks like a single offset would work.
T.
Posted: Thu Apr 26, 2007 8:58 am
by smittysrv
Thanks! Good idea! I'll order an offset rivet set today.
Check this out. Here's a response that I got from Conor in Australia on Vans Air Force. That's using your noodle! Why can't I think of things like that?

Posted: Thu Apr 26, 2007 11:37 am
by kevinsrv7
I modified a 8 inch straight rivet set and it worked perfectly, alot better that the off-set. Here is an example.
http://www.gis.net/%7Erosette/101704.html
Posted: Thu Apr 26, 2007 12:37 pm
by smithhb
Smitty,
I used a short single offset and still had to "flex" the opposing rib just a little but it works.
Posted: Thu Apr 26, 2007 7:14 pm
by RV9inIowa
smittysrv wrote:Here's a response that I got from Conor in Australia on Vans Air Force. That's using your noodle! Why can't I think of things like that?
Smitty - thanks for posting your question and finding this stuff out! I'm a few steps behind you and you're makin' it easy! Your typing paper tip for the fuel tanks is awesome - I never would have figured something out so simple. Now I know to order a small offset rivet set! Keep the tips coming!
Posted: Thu Apr 26, 2007 7:25 pm
by smittysrv
No Prob, Dave. Glad I could help. Applying proseal is certainly a passage of rights for RV builders. When I finished my first tank, I brought it in the house and set it up in the corner of my office just so I could look at it every morning while drinking my coffee.
Posted: Thu Apr 26, 2007 8:30 pm
by RV9inIowa
Wow! I'm doing both tanks at once and I don't think I'll ever want to see them this much again! I just hope they don't leak. I gotta say that working with PS isn't soooo bad, I bought a semco gun for $18 on ebay and it helps a lot. The empty cartridges are only about $1 each and you can reuse them.
All I have left to do are the baffles. Do you think I really need to put a cleco in every baffle hole? I've only used about 25 clecos so far and I don't want to add 150 more and I'm too lazy to clean 'em!
Thanks,
Flap Bracket Question
Posted: Thu Apr 26, 2007 9:03 pm
by smithhb
Definitely!!!!! Use a cleco in EVERY hole to prevent pillowing once you proseal, it will help spread the sealant evenly.
Bret Smith
RV-9A (91314)
Mineral Bluff, GA
www.FlightInnovations.com
From: RB Lists - The Hangar [mailto:
support@rivetbangers.com]
Sent: Thursday, April 26, 2007 9:31 PM
To: hangar@rivetbangers.com
Subject: Flap Bracket Question
Wow! I'm doing both tanks at once and I don't think I'll ever want to see them this much again! I just hope they don't leak. I gotta say that working with PS isn't soooo bad, I bought a semco gun for $18 on ebay and it helps a lot. The empty cartridges are only about $1 each and you can reuse them.
All I have left to do are the baffles. Do you think I really need to put a cleco in every baffle hole? I've only used about 25 clecos so far and I don't want to add 150 more and I'm too lazy to clean 'em!
Thanks,
Dave G.
Sealing both fuel tanks...(yuck)
rivetbangers.com - Discussion topic
http://www.rivetbangers.com/cgi-php/forums/viewtopic.php?p=17242#17242
Submitted via email
Posted: Thu Apr 26, 2007 9:14 pm
by Brantel
Yes,
Use one in every hole. It stinks but that is the best to prevent pillowing. Be sure you have plenty of time to work on the baffle when you start. It is not hard, but very time consuming just to go through the motions. You will start to worry about the sealant setting up before you get done. It takes a ton of time to put in all those blind rivets.
thanks for the tips guys
Posted: Thu Apr 26, 2007 10:59 pm
by RV9inIowa
Brantel wrote:It is not hard, but very time consuming just to go through the motions. You will start to worry about the sealant setting up before you get done. It takes a ton of time to put in all those blind rivets.
That pretty much summarizes my proseal experience so far. Mixing & dispensing the proseal is easy with the Semco, but what seems to take the most time is to dab the sealant in the hole with a toothpick, get a rivet (usually stuck to me), then put in a rivet, then get the squeezer, then squeeze it. I guess I'll just get 'er done.
I didn't think the blind rivets would take any time at all.... I ground down the nose of my pneumatic air riveter and there are only like 50 of them.
Posted: Fri Apr 27, 2007 12:17 am
by cnpeters
On my -9A's first wing, I remember using the offset set and gun and having to squeeze it in place between the ribs - it barely fit. I may try the Australian chap's idea on the right wing, as I'll take a squeezer over a rivet gun for AN470's any day.
Posted: Fri Apr 27, 2007 8:16 am
by Spike
Wow, guess we are all together on this one. Im in the process of sealing my left tank. I have to admit that the proseal isn't so bad as long as you take your time, have patience, and lay everything out in advance.
I just hope it doesn't leak.
Posted: Fri Apr 27, 2007 9:50 pm
by Dan A
Just make sure you put plenty of pro-seal along the seams of the rear baffle. I didn't put enough the first time and they both leaked!

I had to drill out the baffle to skin rivits and force more sealer into the seams and rivit them back together. Even with that I noticed a leak in the left tank this spring and had to remove the left tank and re seal the seam. Fortunately the leak was a seep along the bottom seam about 6 iches from the drain corner. I was able to form a smooth coat in the corner and along the seam past the seccond rib. It is back on now and I will put fuel in it this weekend to check for more leaks. I sure hope it holds!! That may be a good reason to leave the tank screws exposed stainless!! At least you wouldn't ruin your paint job. I've got to do a little repair on mine now.
Dan