
I'm getting ready to drop the order form in the mail for my fuselage and was wondering about when to close up the wings. I plan to use wingtip landing lights and LED navigation light kits. I'm also planning to order the flex conduit from Van's. I'm wondering how hard it is to get wires through the conduit with the bottom skins on. When the fuselage kit arrives, I plan to put the wings in my hangar and would love to have the skins on at that time.
Thoughts?
Closing up them wangs

Smitty-
Wait until you put in the corrugated conduit before you close up the wings. The conduit is a major pain to get through, and you will need to have good access to either side of each rib to get it in. Also, according to the Van's PDF on wing conduit, it says you should put some proseal or RTV where the conduit meets each rib to prevent chafing from vibrations.
Other things to make sure you have done is to make sure the pitot mount is provisioned.
Those are the only things I can think of that I did before I closed up mine. Oh, if you plan to have a Tech Counselor look at your wings, you should have them come over before the wings get closed up.
Mike Bullock
http://www.rvplane.com
RV-7 | Superior IO-360 | Whirlwind 200RV
Garmin GTN650 | GRT Dual Sport SX EFIS
Status: FLYING!
http://www.rvplane.com
RV-7 | Superior IO-360 | Whirlwind 200RV
Garmin GTN650 | GRT Dual Sport SX EFIS
Status: FLYING!
Smitty,
If you plan on going with a traditional pitot tube (like on a cessna), you will need to buy a pitot tube and a pitot mount, such as the one from safeair1.com or Gretz. Both of these require making a hole in the bottom skin and some drilling for screw and/or rivets. WAY easier to do if the bottom skin is off. Here is my writeup of my pitot install:
http://rvplane.com/?categoryid=3&dayid=252
http://rvplane.com/?categoryid=3&dayid=284
The other pitot tube style I have seen is Van's bent tube, in which you have a AN fitting on the bottom flange of the wing spar. If that is the direction you went, then as long as you have the corresponding hole in the bottom wing skin you should be set to close 'em up! Chad has a good writeup on his website on this install here:
http://chadandbrittne.com/September%202 ... 204-06.htm
Mike Bullock
http://www.rvplane.com
RV-7 | Superior IO-360 | Whirlwind 200RV
Garmin GTN650 | GRT Dual Sport SX EFIS
Status: FLYING!
http://www.rvplane.com
RV-7 | Superior IO-360 | Whirlwind 200RV
Garmin GTN650 | GRT Dual Sport SX EFIS
Status: FLYING!

Hi Smitty - I am just about where you are. I put in the vans conduit... it was fine, but a pain to pull. You should proseal it to each rib so it won't twist/wear. After it was in, I tied a cotton ball to some strings and pulled them through to use as wire pulls later. I made small holes in the conduit for the pitot tube and autopilot (see below) and put grommets in to protect the wires.
I also set up the wing for my pitot tube. I'm using the piper "blade" type, instead of the simple tube that vans has on the plans. I put it one bay out from the bellcrank. I made a skin doubler with nutplates to hold it on and I ran the aluminum tube to a bulkhead fitting on the rib. Then I made another tube that runs down to the pitot. The tube is heated so I had to add a nutplate for a ground. I bought new heaters for the pitot tube.
The hardest thing that I did before closing the wings is the autopilot servo. I decided to go with a Trio servo, which I located in the right wing bellcrank bay, flush against the spar just outside of the bellcrank. The pushrod that connects the servo to the bellcrank is only about 5 inches long. It took a long time to figure out but only a few minutes to do.
I have my skins all dimpled and deburred.... and I will probably prime the inside rivet lines this weekend. Wanna come up and help close them up?
Dave G.
Building N149DG RV-9A Finish Kit, O-320-E2A, Dual AFS-3500
Flying the restored N3689Q, the lowest time airworthy Beech Super III.
Building N149DG RV-9A Finish Kit, O-320-E2A, Dual AFS-3500
Flying the restored N3689Q, the lowest time airworthy Beech Super III.
I did the conduit also, and agree it is a pain to get it into the .750" hole. But you only have to do it twice  I used the cotton ball tied to a string and blew it thru with compressed air. I put 5 string pulls in each wing ( What the heck, it was easy ) My pitot tube is Vans set up. Cheap, simple and it works. I did splurge and but Van's stainless pitot tube with the cover, around $30. I'm a VFR only guy and my -7 will be that also. I put a duckworks light in each wing tip also before I closed up. That probably would still be as easy closed, cause all the work is done in the leading edge.
I did have my tech counseler come by before I closed them up. He said all looked good, and I should go ahead and close it up. The following weekend I did one each day, by myself. Ya ever play twister with an aluminum mistress?? Stretching, reaching, skins pushing on your arms. Pretty sore after too. Gettin old does suck. And I'm not even that old!! Glad I didn't wait longer to build this plane!!
My Son Eric has since learned to shoot rivets, and has helped me when I need it now. Sure is nice to have help.
Dave Chapdelaine
N821RV (reserved)
Fuselage
www.davesrv7.com
web site not updated frequently---I'm building
Who am I kidding? It's never gonna be updated again, lol. Been so long I forgot how
N821RV (reserved)
Fuselage
www.davesrv7.com
web site not updated frequently---I'm building
Who am I kidding? It's never gonna be updated again, lol. Been so long I forgot how

Wings
Hey Smitty,
I kinda jumped ahead of you a little... You might check out my site for info on installing my Gretz pitot.
http://www.flightinnovations.com/fusela ... ttom_Skins
Also, I am just now working to close up my wings in order to mate them to the fuselage for the first time. I ran the Vans conduit and could NOT have done it if the bottom skin had been riveted on. I should have all the wiring pulled in the next couple of weeks and be ready to rivet.
Bret Smith
9A Flying (N16BL)
Blue Ridge, GA
http://www.FlightInnovations.com
APRS Tracking: http://www.flightinnovations.com/tracking.html
9A Flying (N16BL)
Blue Ridge, GA
http://www.FlightInnovations.com
APRS Tracking: http://www.flightinnovations.com/tracking.html
Chappy - how did you get the bucking bar to the bottom rivets on the inboard ribs (the ones that are close together)?? My Tech Counselor told me that he attached a bucking bar to a stick and put it though the small holes in the aft side of the rib. Did you have to do something like that?chappyd wrote:The following weekend I did one each day, by myself. Ya ever play twister with an aluminum mistress?? Stretching, reaching, skins pushing on your arms. Pretty sore after too. .
I'm ready to start riveting.... did you follow the instructions for the order to rivet in?
Thanks for any info,
Dave G.
Building N149DG RV-9A Finish Kit, O-320-E2A, Dual AFS-3500
Flying the restored N3689Q, the lowest time airworthy Beech Super III.
Building N149DG RV-9A Finish Kit, O-320-E2A, Dual AFS-3500
Flying the restored N3689Q, the lowest time airworthy Beech Super III.
-
cnpeters

- Class E
- Posts: 185
- Joined: Tue Jul 04, 2006 7:04 pm
- Location: Eureka (St. Louis), MO
- Contact:
Smitty,
I guess I would answer by asking why close the wings now? Advantages of leaving the bottom skins unriveted would be:
1) Ease of installing conduit, wiring, etc, at any time
2) If you decide on any changes in pitot, wiring needs, servos, etc, easy access is there.
For example, I am planning on a TruTrak autopilot - I don't want to buy the $1000 wing servo now in case there are autopilot options a year or two down the road that I may like better when it is time to fit out the avionics. This way, I have easy access when I do decide. One can still fit the servo through the wing access holes, but I feel it would be much easier with the skins off. I won't rivet them until as late as possible.
Also, if I decide to change lighting options, it will be easier.
Regarding the pitot, I did the fitment of the Gretz mount, plumbed the wing for AOA and pitot lines (I have the Dynon combo pitot/AOA). I will do the install later when the skins go on.
-
Lorin Dueck

- Class D
- Posts: 252
- Joined: Sun Dec 25, 2005 2:12 pm
- Location: San Jose, CA
- Contact:
Smitty -
I also just finished putting in the corrogated tube in both wings.
Here are a few suggestions:
1. Start from the 6th or 7th rib inboard and work in one direction and then the other. That way you are not pulling the end of the conduit through all the ribs. Also - it's a lot harder to pull the conduit through the inboard ribs because they are so close together.
2. Don't grab the tube too tight. You can get a crease in it.
3. I found it easier to feed the conduit if I streched it just a little as I was pulling it through the hole.
4. Finally, the corrogations can pinch your fingers as you stretch & relax it. It's not much - but after feeding the tube for an hour - it can get to you.
I did one wing per night.
Good luck!
Lorin D
9A (Wings)
N194LD reserved
Lookey Lookey What I did this weekend
Smitty,
Here is what I did this weekend...
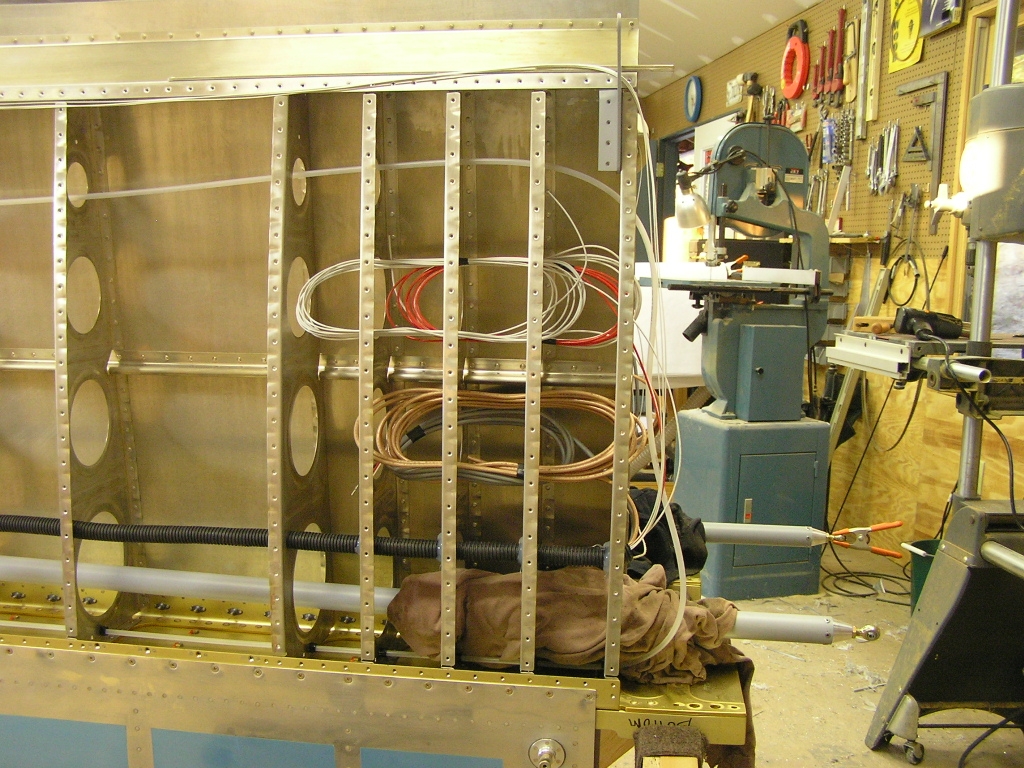
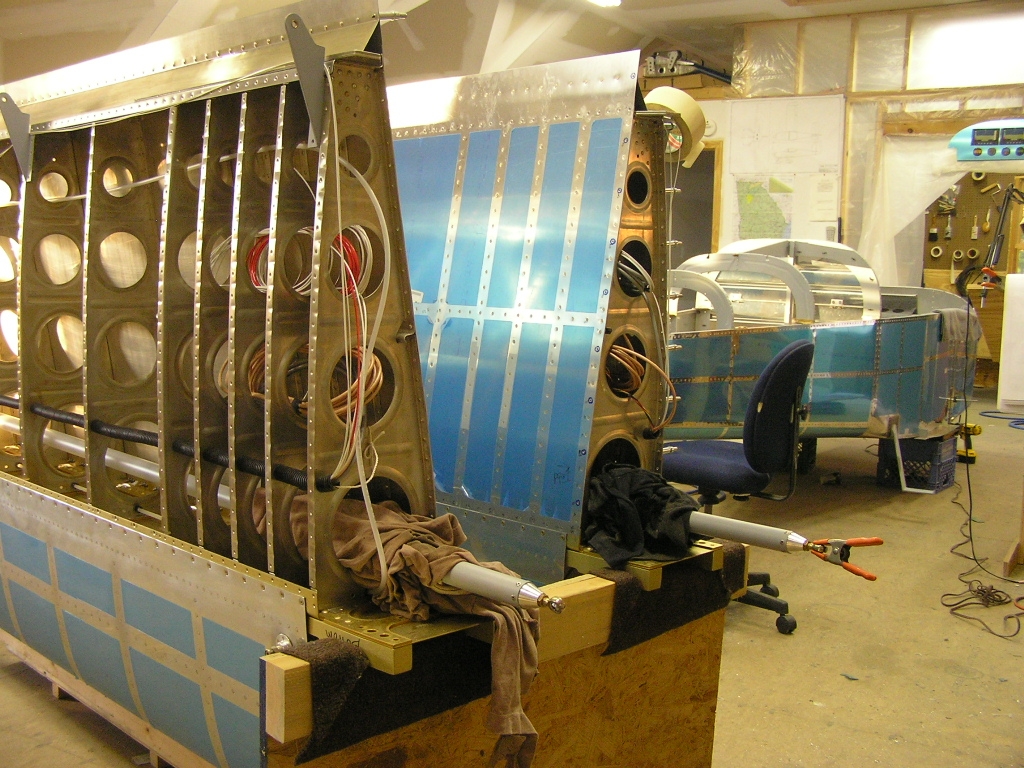
Now on to riveting those bottom skins! I hope to fit the wings to the fuse next weekend. If anyone wants to see ho it's done, come on over. I have Bill Repucci flying over to walk me through it. Plenty of cold brew available
Here is what I did this weekend...
Now on to riveting those bottom skins! I hope to fit the wings to the fuse next weekend. If anyone wants to see ho it's done, come on over. I have Bill Repucci flying over to walk me through it. Plenty of cold brew available
Bret Smith
9A Flying (N16BL)
Blue Ridge, GA
http://www.FlightInnovations.com
APRS Tracking: http://www.flightinnovations.com/tracking.html
9A Flying (N16BL)
Blue Ridge, GA
http://www.FlightInnovations.com
APRS Tracking: http://www.flightinnovations.com/tracking.html
looks good Bret!
Wow Bret - that looks good. I'm at the exact same spot, except I didn't yet make the big pushrods. I heard that sometimes they come up short if you make them per plans so I decided to hold off for now. Did you make yours to the length in the plans?
I found this riveting guide " somewhere (I forget where)... but it's pretty cool:

The builder pretty much followed the plans. Is this the best way? I'm going to leave my wings in the stands and was thinking of starting along the entire rear spar and slowly working my way forward until about halfway, and then working the center ribs forward and out.
Probably I'm thinking when I should be riveting, but sometimes I think I'm betting at building than thinking about building
I found this riveting guide " somewhere (I forget where)... but it's pretty cool:
The builder pretty much followed the plans. Is this the best way? I'm going to leave my wings in the stands and was thinking of starting along the entire rear spar and slowly working my way forward until about halfway, and then working the center ribs forward and out.
Probably I'm thinking when I should be riveting, but sometimes I think I'm betting at building than thinking about building
Dave G.
Building N149DG RV-9A Finish Kit, O-320-E2A, Dual AFS-3500
Flying the restored N3689Q, the lowest time airworthy Beech Super III.
Building N149DG RV-9A Finish Kit, O-320-E2A, Dual AFS-3500
Flying the restored N3689Q, the lowest time airworthy Beech Super III.
does this link work
Sorry for the double post guys... images always mess me up
Dave G.
Building N149DG RV-9A Finish Kit, O-320-E2A, Dual AFS-3500
Flying the restored N3689Q, the lowest time airworthy Beech Super III.
Building N149DG RV-9A Finish Kit, O-320-E2A, Dual AFS-3500
Flying the restored N3689Q, the lowest time airworthy Beech Super III.
Re: looks good Bret!
Dave, I researched the Archives quite extensively and found that the length specified in the Plans for the aileron pushrods is fine. However, I won't really know for sure until I mate the wings and hook up the controls.RV9inIowa wrote:I heard that sometimes they come up short if you make them per plans so I decided to hold off for now. Did you make yours to plan length?
I DID hear that the length for the elevator pushrod is questionable though. I was hoping Smitty would hurry up and get ahead of me so he could be the "guinea pig". Besides, how much could a measly replacement pushrod and end bearings cost anyway?
Bret Smith
9A Flying (N16BL)
Blue Ridge, GA
http://www.FlightInnovations.com
APRS Tracking: http://www.flightinnovations.com/tracking.html
9A Flying (N16BL)
Blue Ridge, GA
http://www.FlightInnovations.com
APRS Tracking: http://www.flightinnovations.com/tracking.html
Re: does this link work
Dave, this is exactly how I plan to rivet the skins. Also, Bill Repucci advised me to rivet the skins on with the wings in the cradle! Makes sense to me and I won't have to clear off the workbench! I should be able to do most of the riveting sitting in a rolling chair.RV9inIowa wrote:Sorry for the double post guys... images always mess me up
Bret Smith
9A Flying (N16BL)
Blue Ridge, GA
http://www.FlightInnovations.com
APRS Tracking: http://www.flightinnovations.com/tracking.html
9A Flying (N16BL)
Blue Ridge, GA
http://www.FlightInnovations.com
APRS Tracking: http://www.flightinnovations.com/tracking.html
Re: looks good Bret!
It's not the cost of the replacement parts - I've already done a lot of thatsmithhb wrote:Besides, how much could a measly replacement pushrod and end bearings cost anyway?
Thanks for the info on the pushrod lengths... I'll check it out and maybe get brave and cut the tubes after the skins are on!
Dave G.
Building N149DG RV-9A Finish Kit, O-320-E2A, Dual AFS-3500
Flying the restored N3689Q, the lowest time airworthy Beech Super III.
Building N149DG RV-9A Finish Kit, O-320-E2A, Dual AFS-3500
Flying the restored N3689Q, the lowest time airworthy Beech Super III.
Another Option
Hi All,
When I closed my wings, I also wondered about the inboard ribs as they are so close together. What I did was this. I installed these ribs one at a time starting with the outboard most rib and moving towards the center rib. This allowed me to rivet both the top skin rivets and bottom skin rivets by simply reaching into the wing root. I also riveted the spar rivets at this time. Worked pretty simple for me.
When I closed my wings, I also wondered about the inboard ribs as they are so close together. What I did was this. I installed these ribs one at a time starting with the outboard most rib and moving towards the center rib. This allowed me to rivet both the top skin rivets and bottom skin rivets by simply reaching into the wing root. I also riveted the spar rivets at this time. Worked pretty simple for me.