Grove Gear Alignment

A forum in which to discuss topics specific to the assembly of the RV 8/8A
User avatar
Wicked Stick
Class B
Posts: 1000
Joined: Wed Feb 09, 2005 10:00 pm
Location: KEWB

Grove Gear Alignment

Post by Wicked Stick »

Image

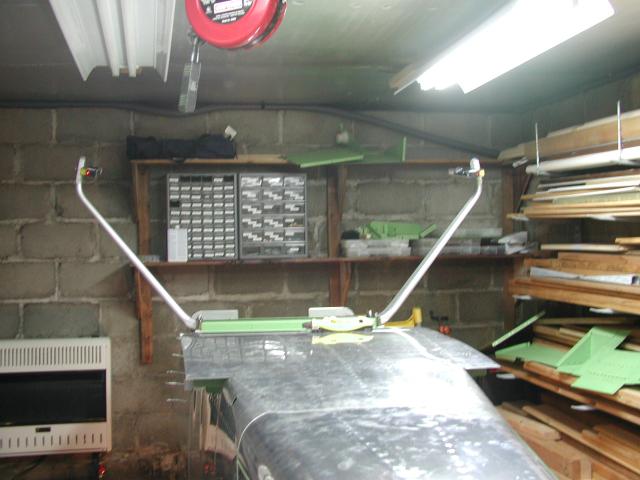
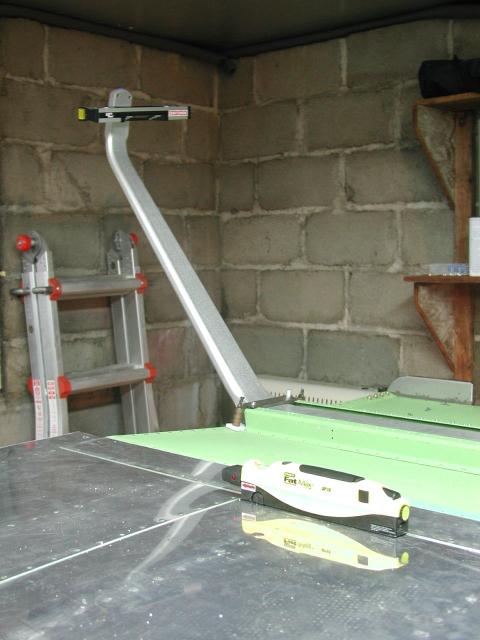
This weekend, I worked on mounting and aligning my airfoiled Grove Gear legs. First I dropped plums on the tail and firewall centerlines, then snapped a chalk line and then verified the chalk line for straightness via a laser level beam. Next I took two 4' levels and clamped them to the gear leg flat spots where the axles will be. Then I dropped a plum line on each 4 foot level, one fore and one aft. This way I could measure from the centerline of the fuse out to each of the 4 plum lines to get them parallel both fore and aft. I was a little hesitant to drop plum lines from the leading edges of the grove gear as Van's instructions detailed for the steel gear, because I wasn't sure if the Grove gear leading edges were straight.

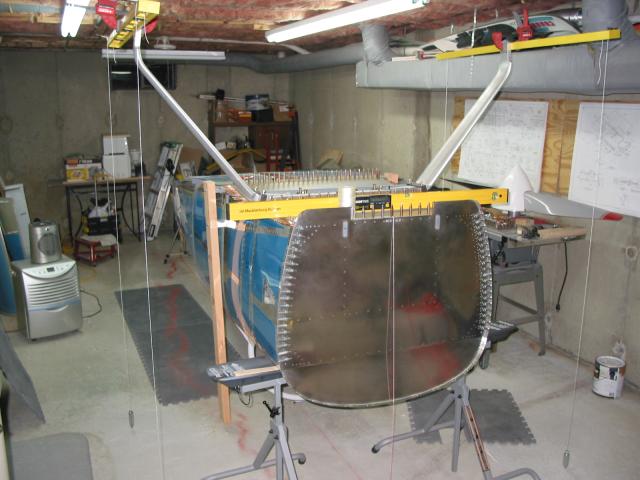
So, I spent about 2 hours moving, measuring, checking, moving, measuring, checking the alignment both fore and aft and for parallel to each other. Once I got them even to the centerline, I did check the measurement from the tail to each gear leg, and came up about 1/8 off from one to the other. (Van's plans allows up to a 1/4 inch.) While I wanted to try and get them perfect, I had to settle for them being off fore and aft the 1/8" because I felt it was more important to have each wheel parallel with the centerline and each other.

Before drilling the gear, I decided to skew the alignment to a slightly toe out configuration. By slight, I mean a tad under 1/8" toe out over a 4 foot span, I figured it would be better than ending up with a chance of a slight toe in configuration which I understand can cause the plane to get a little squirely during take off and landing speeds.

I finally got up the nerve to drill one gear leg tonight (with the help of my wife) and hopefully I can get to the other leg on Monday or Tuesday afterwork.
Dave "WS" Rogers
RV-8 (125 hrs & counting)
N173DR

User avatar
JohnR
Class B
Posts: 1081
Joined: Mon Aug 29, 2005 3:22 pm
Location: Iowa

Post by JohnR »

Looks good Dave. Won't be long you'll have it on the gear! :thumbsup:
JohnR
RV-7A - Fuselage - SOLD, just not supposed to be
Numbers 6:24 - The LORD bless thee, and keep thee

AntiGravity
Class G
Posts: 11
Joined: Mon Aug 21, 2006 12:08 am
Location: Hamilton, New Zealand
Contact:

Grove gear alignment

Post by AntiGravity »

Hi Dave,

I've PDF'd this webpage entry for when I come to do mine. Please give us an update as you progress, especially once you get the wheels on and the aircraft sitting on the gear.

Thanks for the post.
Jeff Preou
Hamilton, New Zealand
RV-8 Fastback slow build.
Tom Clark fastback, Classic Aero seats, Grove Airfoil Gear

ZK-JRV reserved
http://www.preou.com
http://www.kitlog.com/users/index.php?user=jpreou

ptrotter
Class E
Posts: 177
Joined: Mon Oct 25, 2004 9:45 am
Location: New Jersey

Post by ptrotter »

DAve,

It looks like we are at the same point in our construction now. I just did my gear this weekend as well. Mine are a little different as they are one piece so my method was a little different. I didn't have to worry about the legs being parallel with each other as they are already that way. I only had to be concerned about having them parallel to the centerline of the plane. I used lasers to do the alignment. I squared the plane to the end wall of the shop which is about 20 ft. from the gear. I then pointed a laser down the centerline onto the wall. I put lasers on both gear ends and pointed them on the wall as well. Then I adjusted the gear so that the lasers spots from the gear legs were equal distance from the center spot. I think I got it within 1/16" at 20 ft. which corresponds to about .15 degrees. I( think that should be close enough. Here are a couple of pics:


This one shows all the lasers:
Image

A little closer view of the leg:
Image

On this you can see the laser spots on the wall:
Image
Paul Trotter
RV-8 82080 Finish Kit
N801PT

User avatar
Wicked Stick
Class B
Posts: 1000
Joined: Wed Feb 09, 2005 10:00 pm
Location: KEWB

Post by Wicked Stick »

Nice setup with the laser sights Paul... Glad I got to see some pictures of the one piece gear legs too !

Keep em coming and keep at it... Pretty soon you'll be way ahead of me, and I'll be asking you some builder questions. ;)
Dave "WS" Rogers
RV-8 (125 hrs & counting)
N173DR

tshort
Class C
Posts: 618
Joined: Tue Nov 30, 2004 12:56 am
Location: Indianapolis, IN (KUMP)

Post by tshort »

Thanks for the posts, guys - good reference for when I mount my Grove legs!

Couple of questions:

Why the one piece legs? I asked Grove about them and was told they were mainly for rebuilds and planes in which the gear towers had been damaged.

As far as toe in / toe out, could you shim the axle like many do on other taildraggers? Ideally I would like it to be perfect from the get go, but I'm guessing that with the weight of the plane on the gear things will change. I know the alignment procedure for the 170 calls for the plane to be loaded to gross. Compression of the legs will change things, I would think.

Thoughts?

Thomas
Thomas Short
Indianapolis, IN (KUMP)
RV-8 wings

ptrotter
Class E
Posts: 177
Joined: Mon Oct 25, 2004 9:45 am
Location: New Jersey

Post by ptrotter »

Tom,

There are a couple of reasons for the 1-piece gear. First, it is a lot easier to install, you only have to worry about making sure the gear is parallel to the centerline and do not have to worry about the gear being aligned with each other. But he primary reason is that I feel that the gear tower is problematic especially if you side load your gear when landing in a crosswind. The gear tower is designed primarily for compression on the outside and tension on the inside. In normal landing, this is what happens. On the other hand, if you side load the gear, you get tension on the outside and compression on the inside. The outside handles tension well, but I don't think the inside handles compression quite as well. The gear leg could act like a can opener and damage the gear tower in extreme cases. With the one piece gear you put all the stress on the outside even in a side load condition. I could have redesigned the gear tower much smaller if had wished to, but I had them built when I made the decision on the one piece gear. Another advantage is that the single piece gear can flex in the middle and absorb some of the impact on landing. At Sun 'N Fun last year I spent some time with Ken Krueger discussing the one piece gear and he could not find any argument against it so I decided to give it a try. Although Grove initially made the one piece gear for someone who messed up his gear towers, he feels they are better than 2 piece gear in general. I wish they made an airfoil version of them though.

With respect to toe in/out, you can shim the axles. Grove has shims for this purpose in several different sizes. With the one piece gear, I have no control over toe-in as you do with separate gear legs and would have to use shims if I need to adjust it.
Paul Trotter
RV-8 82080 Finish Kit
N801PT

User avatar
captain_john
Sparky
Posts: 5880
Joined: Sun Oct 31, 2004 9:17 am
Location: KPYM

Post by captain_john »

Looks great, guys! It is uncanny that you both are at the same place much like JohnR and I are!

Paul, I like seeing the pics of your shop! It is interesting to see what another's shop looks like!

Keep up the good work!

:mrgreen: CJ
RV-7
Garmin G3X with VP-X & a TMX-IO-360 with G3i
It's all over but the flying! 800+ hours in only 3 years!

briand
Class E
Posts: 51
Joined: Sat Oct 27, 2007 6:58 pm

Post by briand »

I'm at this stage now and when I get my two gear lined up, the right outboard wear plate has to be way back. It's actually almost half way on top of the AN470 rivet. The left gear is about perfectly centered between the 802's. I tried the parallel angle method and the 4 bobs across the front of the gear with 1 at the 812 method. Both gave similar results.

Also does any one know if the 805-1 wearplates are supposed to have the two 3/8" holes drilled at the factory. I was reading someones write-up on drilling these where it appeared they should be drilled by the builder. Mine came drilled.


Image
RV-8 Fuse/Finish

User avatar
Wicked Stick
Class B
Posts: 1000
Joined: Wed Feb 09, 2005 10:00 pm
Location: KEWB

Post by Wicked Stick »

I don't think you can ever get them aligned perfectly... except maybe if you have the one piece gear like Paul Trotter's.

The important thing is that they are parrallel to the center line of the fuse and parrallel to each other. If they are off a bit fore and aft I wouldn't worry too much about that.

Do you have any pictures taken looking straight down from above. This would help us to see what your seeing with regards to fore/aft position and the overhang of the flush rivet mentioned.

As far as drilling them, I think it's best to drill the smaller holes first to help hold it in place, and then drill the big ones last. Use oil and a nice quality sharp bit and take your time.
Dave "WS" Rogers
RV-8 (125 hrs & counting)
N173DR

briand
Class E
Posts: 51
Joined: Sat Oct 27, 2007 6:58 pm

Post by briand »

It would be too hard to get a pic from above but if you compare the pic. in my last post (right), to the pic. in this post (left), you can see, using the aft 470 rivet as a ref. the right is quite a bit further aft. If my positioning is correct I will have to file a bunch off my 805-1 to go around the rivet as well as the edge of the 805-1 because it hits the 802L aft cross member. If those 3/8" holes in the 805-1 were not already drilled I could shift just the gear and the 803 attach brkt.

I think the -1 might mean that the 3/8" holes come already drilled. If so, I think that revision was a bad idea.

Someone brought this same issue up on that other board but basically his outcome was: he went to bed and got up the next morning and everything was lined up. I'm not holding my breath for such luck. If you ask me the VAF Mafia got ahold of him and told him to keep his mouth shut. :mrgreen:

Image
RV-8 Fuse/Finish

Dan A
Class D
Posts: 310
Joined: Sun Oct 24, 2004 6:18 pm
Location: Cheney, WA USA

Post by Dan A »

I think Paul made the right decision on the one piece gear. If you need any confirmation, just ask Randy Lervold about side loading the gear of an 8. I would have the one piece gear in my plane if they had been available when I was constructing my fuselage. The one piece gear would have saved several RV8's from colapsing had they had the gear.
Dan N742DA

User avatar
captain_john
Sparky
Posts: 5880
Joined: Sun Oct 31, 2004 9:17 am
Location: KPYM

Post by captain_john »

Dan, Dave's two piece gear seems pretty stout.

I dare say that it would be very difficult to collapse.

Has the two piece stuff ever failed under the worst possible conditions?

:? CJ
RV-7
Garmin G3X with VP-X & a TMX-IO-360 with G3i
It's all over but the flying! 800+ hours in only 3 years!

tshort
Class C
Posts: 618
Joined: Tue Nov 30, 2004 12:56 am
Location: Indianapolis, IN (KUMP)

Post by tshort »

I asked Robbie Grove himself about that at OSH and he said they really only sell the 1 piece gear for planes that have had damage and can't have the two piece gear installed.
I didn't know about Paul's gear then (this was summer 2006) so I didn't mention it...

My 2 piece gear seem pretty stout ... I would venture to guess that if you land with that much side load in a tailwheel airplane you may have other problems to worry about! :)

T.
Thomas Short
Indianapolis, IN (KUMP)
RV-8 wings

User avatar
Wicked Stick
Class B
Posts: 1000
Joined: Wed Feb 09, 2005 10:00 pm
Location: KEWB

Post by Wicked Stick »

The gear are pretty durable and fine for landings. It's only if you get the plane going sideways that would be an issue, and like others have said...
"If you get it going sideways with enough load to fold the gear, you probably have a lot of other issues of damage coming along with it anyway."

I'm sure the gear will withstand normal side loads from crosswind landings just fine, it's the ground looping that might be too much to handle.
Dave "WS" Rogers
RV-8 (125 hrs & counting)
N173DR

ptrotter
Class E
Posts: 177
Joined: Mon Oct 25, 2004 9:45 am
Location: New Jersey

Post by ptrotter »

The issue isn't the gear itself, it is the gear towers. There have been a couple of cases where the gear towers have colapsed due to side loading. That is why Grove came up with the one piece gear.

In a normal landing, you get compression on the outside of the gear tower and tension on the inside of the gear tower. The gear towers handle this well. However if you side load the gear, you get tension on the outside and compression on the inside. The towers handle the tension on the outside well, but do not handle compression on the inside quite as well, and it is possible to colapse the inside of the tower. This is probably not a very likely occurance but since there was an option, I chose to use it.

The one piece gear is connected to the fuselage only at the outside, there is no connection at the inside of the gear tower. In a normal landing, you still get the compression on the outside of the gear towers, but if you side load the gear, you get tension on one side as you would with the two piece gear, but you do not get the compression on the inside of the gear tower any more. You get compression on the opposite side, which it handles well. In addition, with the one piece gear, you get a little springiness in the center section which absorbs some of the energy if you land hard.

I spent a lot of time with Robby Grove discussing this before I made my decision. I also spent about a half hour with Ken Kreuger discussing this as well. He could not come up with any down side to a one piece gear, so I decided to go that way. I also asked Van about it and his comment was that there are trade offs either way, but wouldn't say anything more as is typical of Van.

It was much easier to install and align than the two piece gear. If I had wanted to take the time, I could have redisigned the gear towers to take up less space as they are really not needed with the onepiece gear, but I had already built them at that point.

The one piece gear is fairly common on a lot of planes, so it is quite proven in concept.

I don't think there is any real problem with the two piece gear, but crosswind landings are not my best skill, so I decided to go this way to minimize any possiblity of damage.
Paul Trotter
RV-8 82080 Finish Kit
N801PT

briand
Class E
Posts: 51
Joined: Sat Oct 27, 2007 6:58 pm

Post by briand »

Here is the reply I got back from Van's:

Your Fuselage kit shipped in June of 2006, which mean that your U-805-1
is
pre-drilled. Some of the older versions were not.
Can you position your U-805-1 is a position where there is no rivet
interference, and still get the plumb bobs to line up? You could grind
just a
smidge off of the wear plate to clear the rivet also. This shouldn't
adversely
affect anything. The overall idea is to get the axles parallel, even
if it is
slightly off of the ship centerline. Since there isn't a left or a
right on the U-
805-1 parts, have you tried swapping them around to see if it affects
the fit?

Joe
Vans Aircraft


I have to grind about 1/16" off to clear the rivet. Don't know if that falls under "smidge". I also have to file on one edge so it won't dig into the 822 floor skin. See red marker areas in pic..

I did try swapping and it helped but only making it so I could actually get both 3/8" to go through the pre drilled holes in the wear plate.

I think I'm just gonna grind away and build-on.

Image
RV-8 Fuse/Finish

User avatar
4kilo
RB's First
Posts: 227
Joined: Mon Nov 08, 2004 10:32 am
Location: GPM (Grand Prairie, Texas)
Contact:

Post by 4kilo »

Brian,

From the pictures and the amount you need to grind or file, I wouldn't even loose a second sleep over it.

Pat
RV-8
N804PT - IO-360, Hartzell blended airfoil, GRT dual Horizon I & EIS, TruTrak ADI Pilot II
Flying - 950 hours!

jetjoc
Class G
Posts: 34
Joined: Sun Dec 17, 2006 6:29 pm
Location: Lexington, Kentucky

Post by jetjoc »

On the 2 piece gear issue. I know from EXPERIENCE(unfortunately), that the stock Van's Gear WILL collapse on a groung loop! Mine folded under the wing and damaged the bottom of the wing. The gear leg actually snapped in two just outside of the mounting bracket. The gear tower had a bit of a kink, but was OK/. I now have the grove gear!
Al Grajek
RV8

jetjoc
Class G
Posts: 34
Joined: Sun Dec 17, 2006 6:29 pm
Location: Lexington, Kentucky

Post by jetjoc »

Hey Dave.
How ya been?
You will love the grove gear. I have them on my 8.
I hope to visit the cape in my 8 this spring. Ill look you up.
Al Grajek

Post Reply