
Hello all
I have a slight query on my undercarriage! I am in the process of fitting the legs to my RV8 QB fuselage. The legs are held on by a 7/16th bolt as per the instructions.
The instructions go on to say about attaching plumb-lines to both inboard & outboard leading edge of the legs and a fifth plumb-line in the F812-1 bulkhead assembly tooling hole.
This is where I am confused! I cannot find reference to this part in my plans or see an obvious hole through which to place the plumb-line!! It's probably staring me in the face but I cannot see it for looking!!
Can anyone help with this please? Or offer an easier way of fitting the legs accurately?
Any help would be gratefully received!
Many thanks
Rob
RV8 Undercarriage Mounting
RV8 Undercarriage Mounting
RV8 Flying G-DOBS
-
Wicked Stick

- Class B
- Posts: 1000
- Joined: Wed Feb 09, 2005 10:00 pm
- Location: KEWB
Hi Rob,
Here's the whole thing as I saw it.
1. you want the axles to be parallel both to each other and the center of the fuselage. Most important is that they are parallel to each other.
Rather than drop plumb lines from the front of the legs, here's what I did.
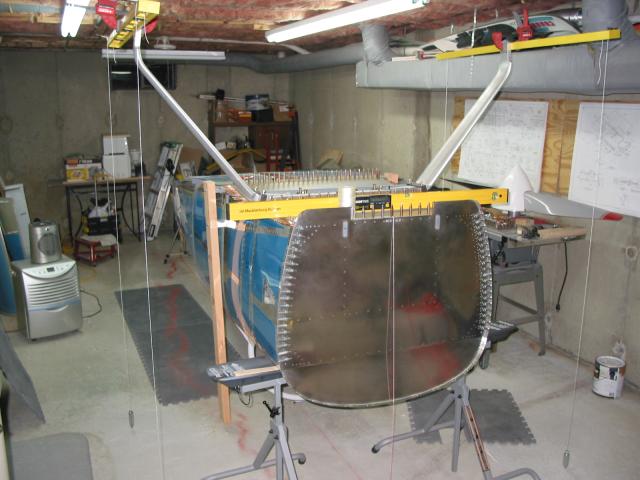
I attached two 4 foot levels to the area where the axles will bolt on.
This allows you to have a much greater distance to measure from to get them parallel to each other.
Also note the plumb line for the center of the fuselage. I did it this way instead of having to drill a hole. (there's also one back at the tail)
Next I snap'd a chalk line from it and used that fuselage centerline to measure/check eveything to.
Pay no attention to the squiggly red chalk line, LOL, I put WAY too much chalk in the thing before using it and when I wound it back in, it was dropping excess chalk everywhere.
Here's the whole thing as I saw it.
1. you want the axles to be parallel both to each other and the center of the fuselage. Most important is that they are parallel to each other.
Rather than drop plumb lines from the front of the legs, here's what I did.
I attached two 4 foot levels to the area where the axles will bolt on.
This allows you to have a much greater distance to measure from to get them parallel to each other.
Also note the plumb line for the center of the fuselage. I did it this way instead of having to drill a hole. (there's also one back at the tail)
Next I snap'd a chalk line from it and used that fuselage centerline to measure/check eveything to.
Pay no attention to the squiggly red chalk line, LOL, I put WAY too much chalk in the thing before using it and when I wound it back in, it was dropping excess chalk everywhere.
Dave "WS" Rogers
RV-8 (125 hrs & counting)
N173DR
RV-8 (125 hrs & counting)
N173DR

-
Wicked Stick
- Class B
- Posts: 1000
- Joined: Wed Feb 09, 2005 10:00 pm
- Location: KEWB
Yep, it's a great way to get it straight.
Sometimes though, the alignment of the U-brackets ends up interferring with one of the "S" channels once it's aligned.
You also have to make sure it doesn't move while drilling them in place either. I had one that moved slightly during drilling so I "may" have to add a shim to that leg.
Sometimes though, the alignment of the U-brackets ends up interferring with one of the "S" channels once it's aligned.
You also have to make sure it doesn't move while drilling them in place either. I had one that moved slightly during drilling so I "may" have to add a shim to that leg.
Dave "WS" Rogers
RV-8 (125 hrs & counting)
N173DR
RV-8 (125 hrs & counting)
N173DR
Thanks Gents; still looks a little fiddly for dufus like me though!! I will get down the hardware store tomorrow and buy a few long spirit levels I think!
So, if using your method I add a plumb-line from dead-centre on the bottom of the firewall? I'm just very concerned at getting it slightly wrong and screwing it up!!
Thanks again
So, if using your method I add a plumb-line from dead-centre on the bottom of the firewall? I'm just very concerned at getting it slightly wrong and screwing it up!!
Thanks again
RV8 Flying G-DOBS
<<if using your method I add a plumb-line from dead-centre on the bottom of the firewall? >>
I suggest eliminating plumb lines entirely. Mount a straightedge (aluminum angle, bubble levels, whatever) on each gear leg at the axle face. Swivel the legs so you have equal measurements across the fuselage taken at the front and rear ends of straightedges. Now measure from the tailwheel socket to an identical point on each leg. Keep measuring and adjusting until the two "across" measurements are equal and the measurements from the tailwheel socket to each leg are equal.
For the tailwheel-to-leg measurements I used a length of safety wire with a loop at the tailwheel socket, and pulled it to 4 lbs with a fish scale. You can mark a scale on some tape and attach it to the wire if you wish. Lots of other ways to do it of course...just make sure you do something accurate and repeatable.
BTW, don't tighten the big inboard bolt if doing so lifts the leg off the outer longeron area. You want the leg firmly seated in its final position.
I think drilling with the clamp block as a guide is pretty iffy. Make or buy a center punch with a precise 3/8" OD, punch good marks through the block hole, pilot drill 3/16 with a cobalt bit, use a big slow drill with lots of pressure.
Dan Horton
RV8 QB
Barrett IO-390
RV8 QB
Barrett IO-390
-
Spike
- Chief Rivet Banger
- Posts: 4013
- Joined: Thu Oct 14, 2004 8:40 pm
- Location: Baltimore, MD
- Contact:
And remember, don't get too spun up on exact perfect super accurate measurements down to the nano-inch. We are building tractors after all 
Spike
Spike
http://www.rivetbangers.com - Now integrating web and mail!
Current Build: 2 years into a beautiful little girl
Current Build: 2 years into a beautiful little girl
-
Wicked Stick
- Class B
- Posts: 1000
- Joined: Wed Feb 09, 2005 10:00 pm
- Location: KEWB
As long as you have both main axles parallel to each other, that's the most important thing. If you are slightly off to the center of the fuselage it won't make that much of a big deal.
You really don't want the left main wheel going in a different track than the right main wheel. As long as they are both going the same direction, you won't even notice if they are slightly off center to the centerline of the aircraft.
You really don't want the left main wheel going in a different track than the right main wheel. As long as they are both going the same direction, you won't even notice if they are slightly off center to the centerline of the aircraft.
Dave "WS" Rogers
RV-8 (125 hrs & counting)
N173DR
RV-8 (125 hrs & counting)
N173DR
-
Wicked Stick
- Class B
- Posts: 1000
- Joined: Wed Feb 09, 2005 10:00 pm
- Location: KEWB
-
Spike
- Chief Rivet Banger
- Posts: 4013
- Joined: Thu Oct 14, 2004 8:40 pm
- Location: Baltimore, MD
- Contact:
I am glad to hear that would could be of help!
http://www.rivetbangers.com - Now integrating web and mail!
Current Build: 2 years into a beautiful little girl
Current Build: 2 years into a beautiful little girl