Greg Niehues
Midland, TX
RV9A - finishing - 90% done, 90% to go http://websites.expercraft.com/airguy/
Building a 9A with too much fuel and too much engine - should drop dead any minute now.
I remember the feeling of putting the Aft, Center, and Forward Sections Together with clecos for the first time and thinking this thing is really big. With no wings on the fuselage it really looks long. Then comes when you flip it and get in.
My wife was the first into my Fuselage with me soon behind after setting the camera on the timer.
It's hard to tell from looking at your pics, but if you haven't done it yet, I would recommend drilling the holes in the F-705 bulkhead now for the static line to pass through. It's not mentioned in the plans, and doing it now is much easier than it would be later on when all this is riveted together. Here are a couple pics showing how and where I did mine:
Ah, so that's where all those bulkheads go I've been working on for months
I spent hours over the weekend trying to figure out where that static line is suppose to go. On the 7 plans it is shown on the left side on some drawings, and on the left on others, and nowhere in the instructions. Finally I looked through some forum postings and discovered I wasn't the only one that couldn't find the instructions.
I too am looking forward to putting those bulkheads together and then joining the sections, looks good airguy.
Bruce - thanks for the tip, I'll definitely do that!
I hung the firewall this evening...
Greg Niehues
Midland, TX
RV9A - finishing - 90% done, 90% to go http://websites.expercraft.com/airguy/
Building a 9A with too much fuel and too much engine - should drop dead any minute now.
dons wrote:
I spent hours over the weekend trying to figure out where that static line is suppose to go. On the 7 plans it is shown on the left side on some drawings, and on the left on others, and nowhere in the instructions. Finally I looked through some forum postings and discovered I wasn't the only one that couldn't find the instructions.
I've noticed as I make my way through the kit that the instructions more and more frequently "neglect" to mention certain smaller items. There are some things that the writers simply assume we will be able to figure out by this point. It took me the better part of 20 minutes to figure out whether or not I was supposed to rivet the center section bottom skin to the aft portion of the 904 at the same time I was riveting it to all the seat ribs. Likewise with the 915 side seat ribs, construction path for those is very confused. I find myself having to read and re-read the instructions sometimes several pages ahead to "get a clue" about what stage certain parts are expected to be in at that point, and then backtrack and extrapolate that to tell me what needs to be done (or not) right now.
Greg Niehues
Midland, TX
RV9A - finishing - 90% done, 90% to go http://websites.expercraft.com/airguy/
Building a 9A with too much fuel and too much engine - should drop dead any minute now.
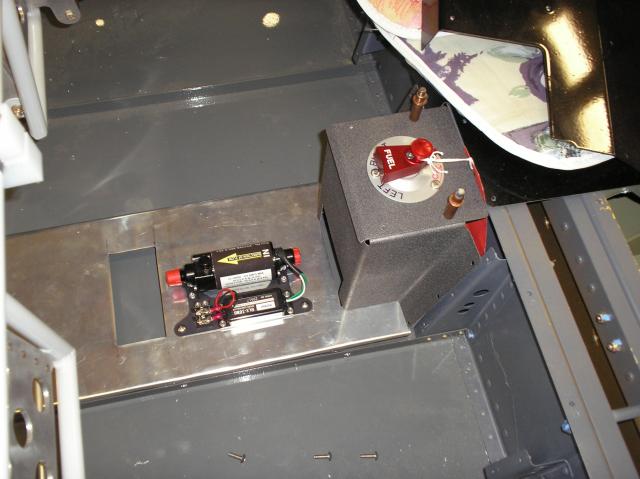
All, when you get to this point be sure to rivet your angles for the fuel line covers on the thick doublers on both sides of the fuse where the fuel lines exit. Also drill those fuel line holes while you are there! It will prevent alot of hassles later down the road.
Hope this helps!
CJ
RV-7
Garmin G3X with VP-X & a TMX-IO-360 with G3i
It's all over but the flying! 800+ hours in only 3 years!
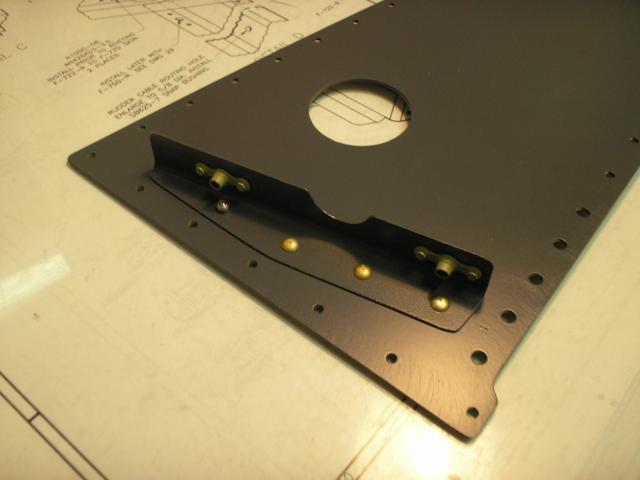
This is my F-7101 web with the F-782 D angle already attached.
It is WAAAAY easier to do these things early in the game. Also drill the fuel line hole through it before it is assembled to avoid shavings falling into crevices and staying there for eternity!
I know, the last post was kinda, do the thing with the thing before you do the thing...
Is this any clearer?
CJ
RV-7
Garmin G3X with VP-X & a TMX-IO-360 with G3i
It's all over but the flying! 800+ hours in only 3 years!
Hahahaha... looks like it is!!! I was surfing around your site after Chad poked ya in the other thread and saw the cluster that you had to go through in doing this job and thought that it would illustrate it well for those in process now.
...and FYI, I have installed my Andair fuel pump and am working on my systems now, AS WE TYPE! I just sent Brett at Bonaco an email to order my brake lines from him!
I also installed the clip you sent me a month ago. Thank you very much!
I am back on track!
Pics to follow!
CJ
RV-7
Garmin G3X with VP-X & a TMX-IO-360 with G3i
It's all over but the flying! 800+ hours in only 3 years!


CJ