This past Saturday I was on my first instrument rating lesson - something I have been putting off for some time now. The lesson was pretty straight forward - climb up to 6,500' heading 360, following by a series of ascending and descending climbs while under the hood. Next up was a VOR/ILS approach into Capital City airport near Harrisburg, PA. After figuring out how to get the Grand Rapids EFIS to properly display the CDI/HSI from the Garmin 430W, we were in business. Next up was a practice hold followed by a GPS approach into York, PA (KTHV).
As we were approaching the fix for the hold, the airplane developed a very noticeable shake. Clearly something was not right with the engine. Automatically without me even thinking, I pushed the mixture full rich and turned on the fuel pump. My CFII looked out the window to point me towards York airport. I didn't have it in sight, as my mind was going a million miles an hour. I was lucky to have him in the airplane to point me where I needed to be. We were still developing power, and we were within easy gliding distance of the airport just in case the engine had other ideas. A glance at the engine monitor showed what the root cause of the issue was - the EGT for the #2 cylinder was non-existent. The CHT was decreasing quickly. It was clear that the #2 cylinder was not producing power.
We were 2,000' over KTHV when the engine all of the sudden started performing normally again. The EGT immediately came back to normal, and the CHT was increasing. I glanced at my flight instructor and we both thought it would be better to put the airplane down back home at KDMW - a short 10 minutes away. We circled over KTHV gaining altitude and listening to the engine. Things seemed fine. All engine parameters looked to be back in the green. We headed to KDMW.
Roughly half way to KDMW, the engine stumbled very quickly. Not enough for the engine monitor to notice anything, but both of us definitely heard something. We stayed high and circled down to a non-event of a landing.
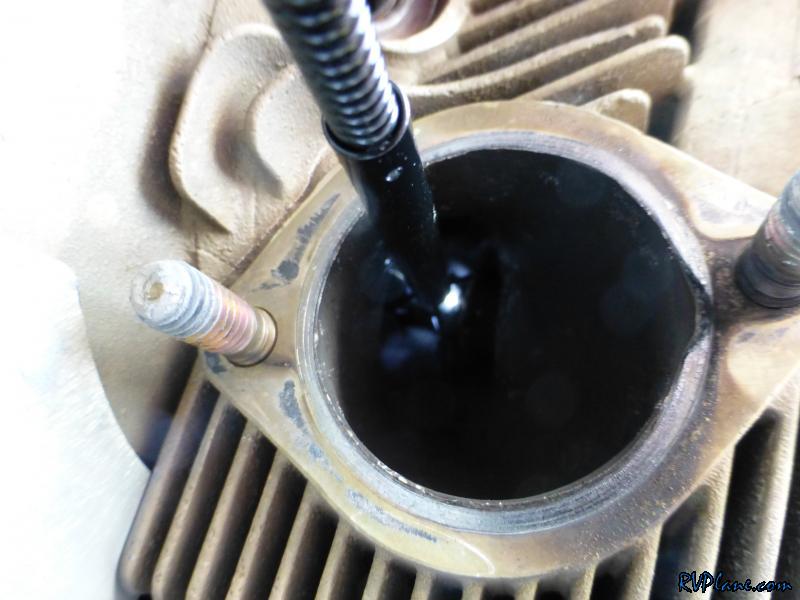
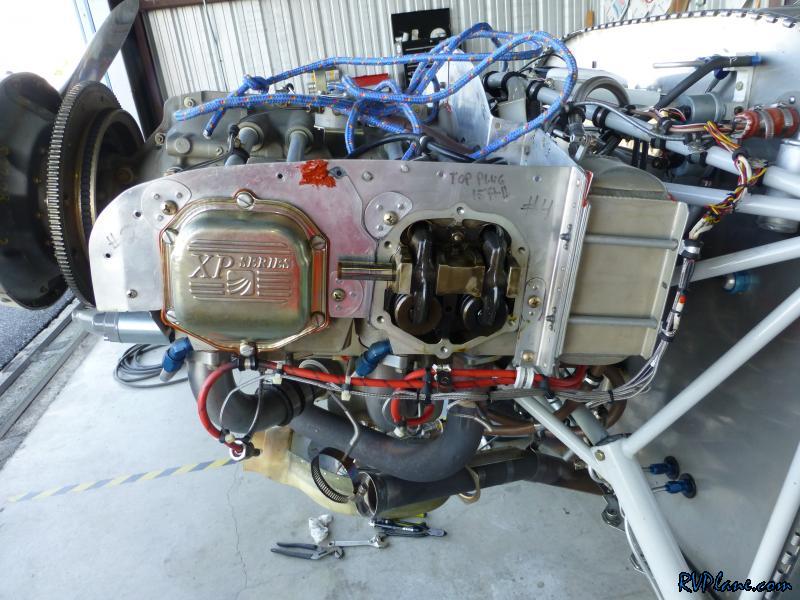
I was lucky to be in the presence of Captain John and his endless knowledge of everything airplane at KDMW. We decowled the RV and started digging around the #2 cylinder. Both spark plugs looked to be in fine condition (EMAG on the top plug with an auto plug, Slick mag on the bottom with a massive electrode plug). Next up was a compression test - 78/80, with the slight leakage coming through the rings (audible noise through the oil filler tube).
Naturally I would be lucky enough to have an intermittent issue. Now how to figure out how to fix it?!?! An engine needs three basic criteria to work - spark, compression and fuel. If the spark was lost, both the EMAG and Slick mag would of stopped firing in that cylinder. If the EMAG would of quit, the other cylinders would have symptons of elevated EGT's. This wasn't the case. The lack of fuel was a more likely symptom, especially if an injector was clogged. However, I found it to be unlikely that an injector would be clogged so immediate, and then unclogged immediately also. Typically when I have had a clogged injector, I get elevated EGT's, and it typically doesn't cure itself. The last issue is a lack of compression. What could of caused this is a stuck exhaust or intake valve being open. An open valve during the compression stroke of the engine would definitely cause the symptoms I saw.
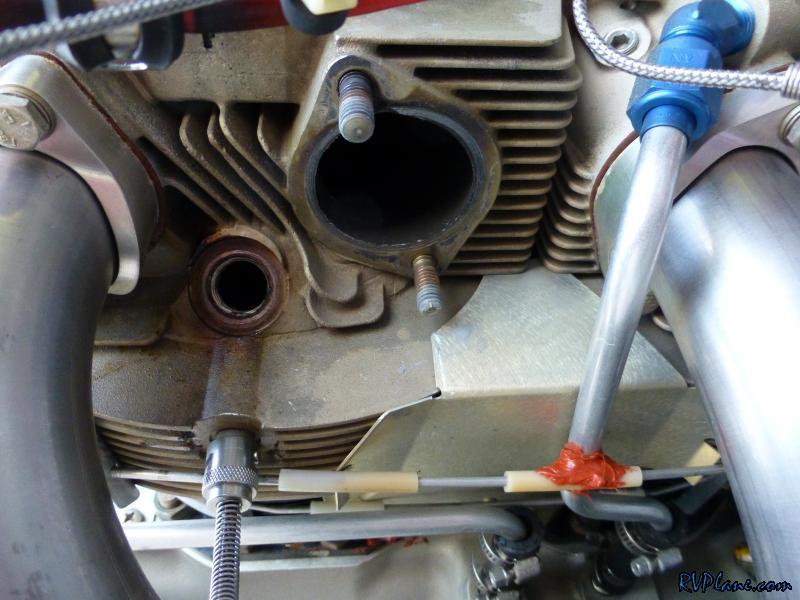
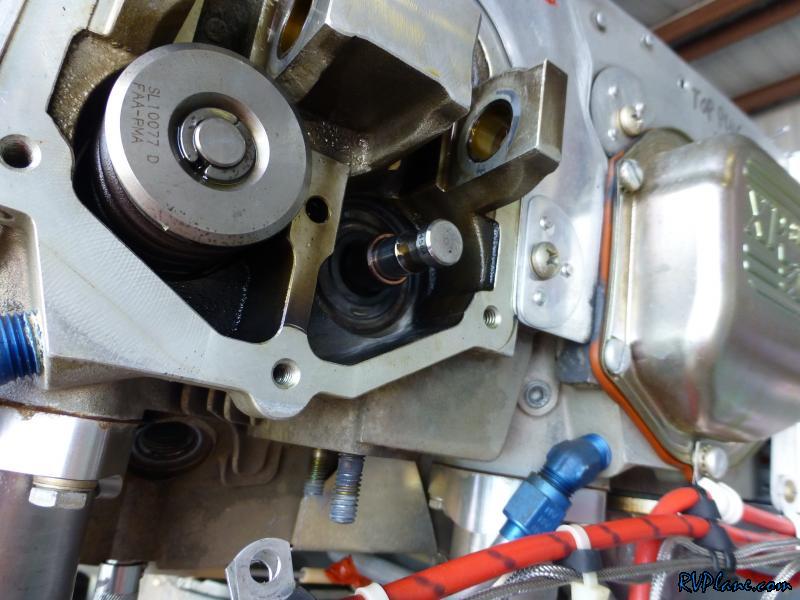
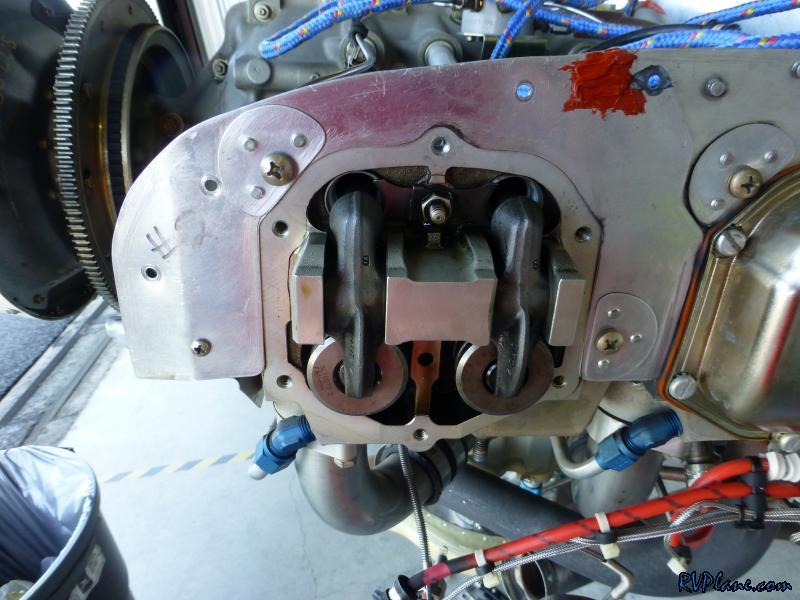
The first step to investigating a stuck exhaust valve was removing the valve cover.
Next up was removing the rocker valves. To do this, you need to push out the rocker shaft. The rocker shaft is kept in place by the valve cover - the cover prevents the shaft from moving left or right. With the #2 piston at BDC, the shaft pushes out easily with just your fingers.
I removed the shaft and the two rocker arms and stored them with where they were originally on the engine.
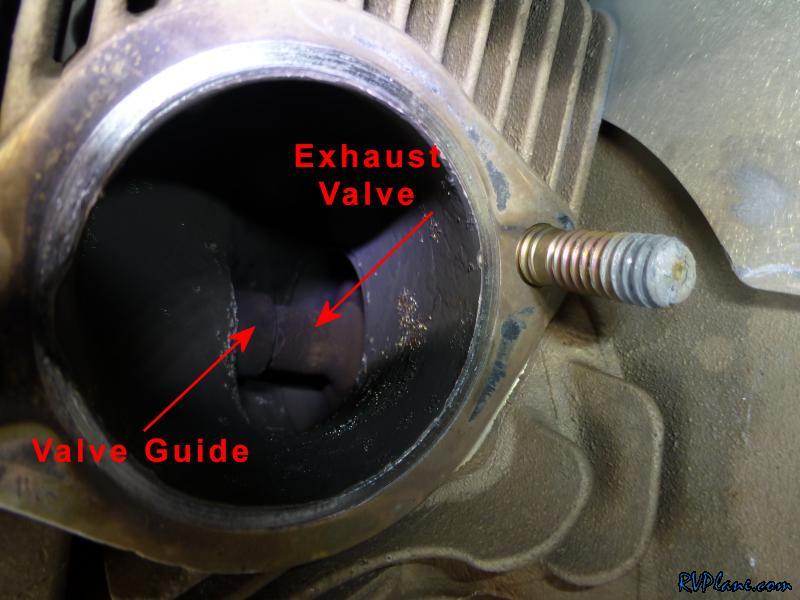
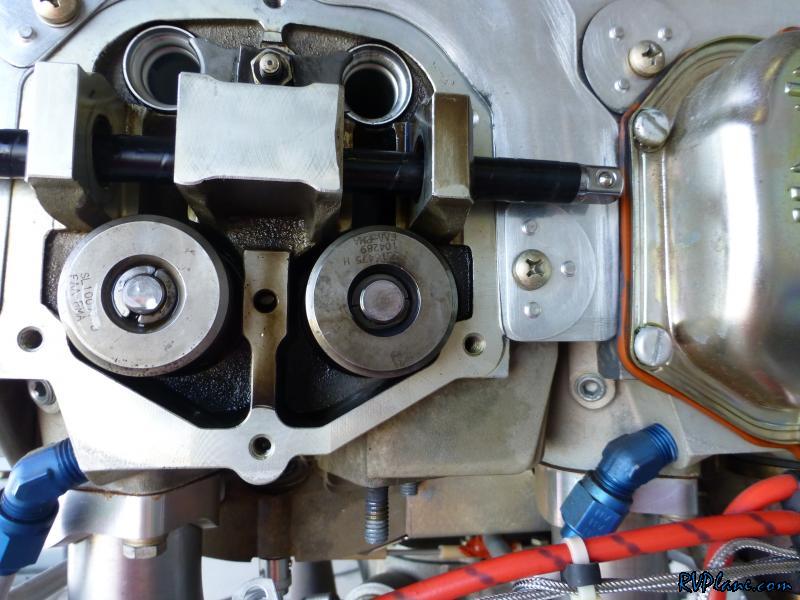
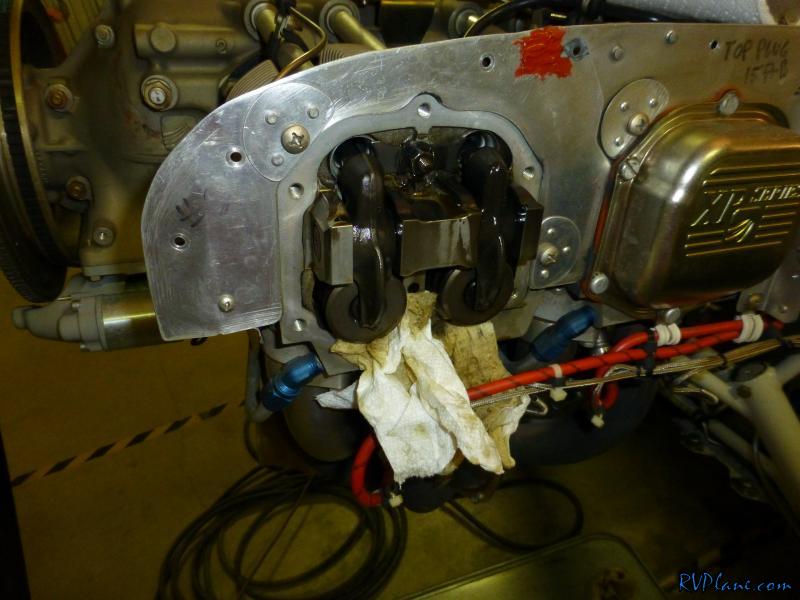
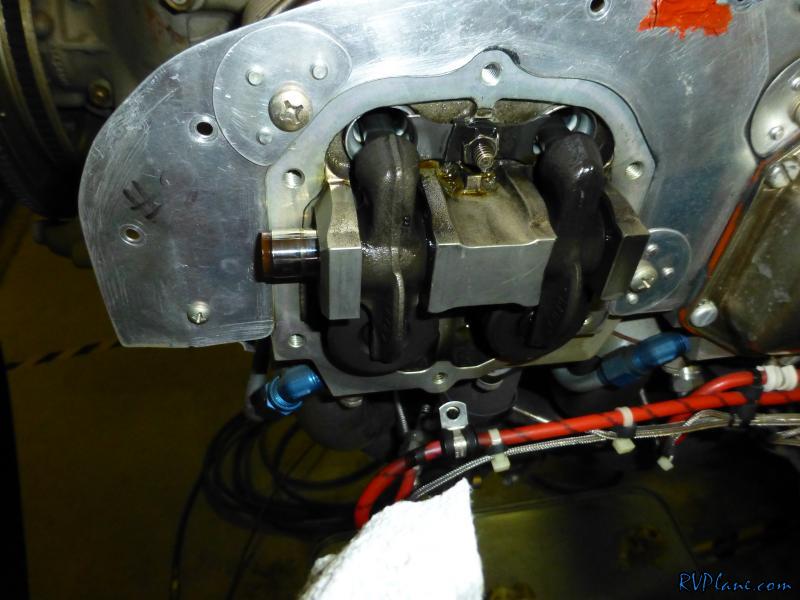
This is the top of the cylinder with the rocker arms removed.
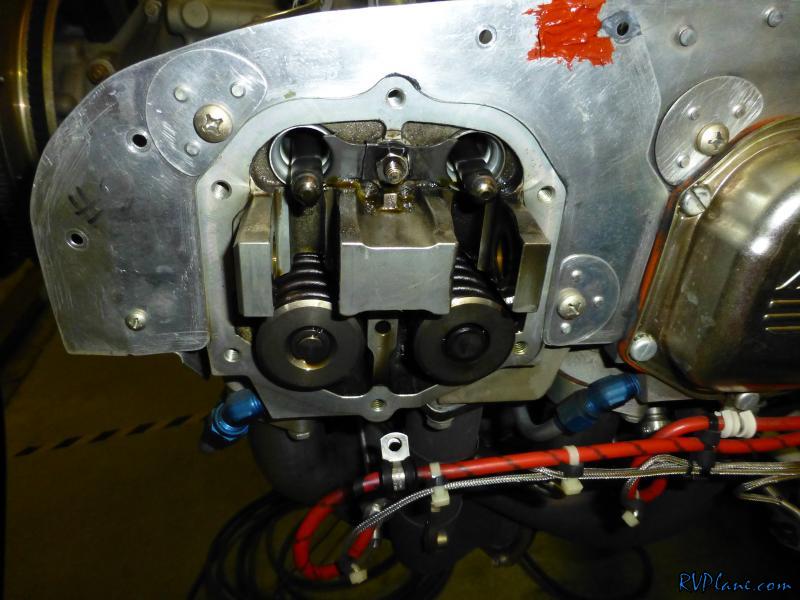
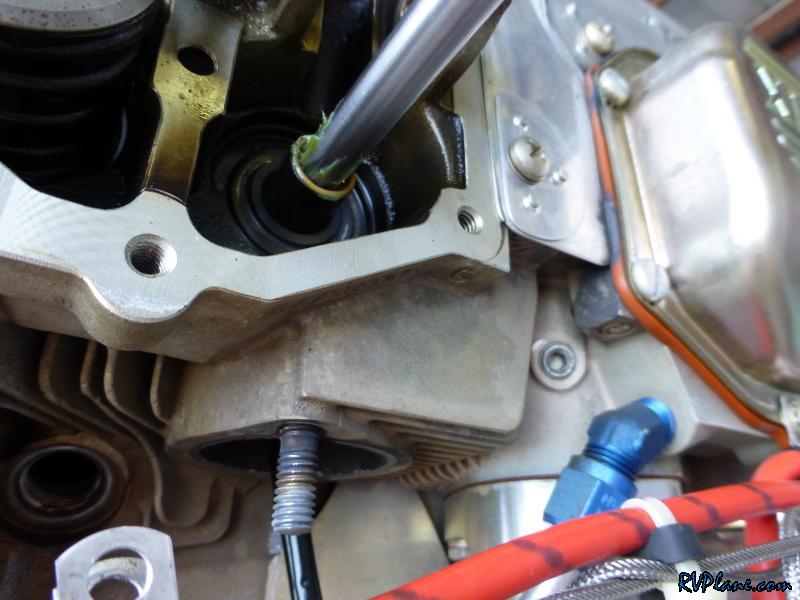
There is a cap over the top of the exhaust valve stem. This pulls off easily with a magnet or a dental pick.
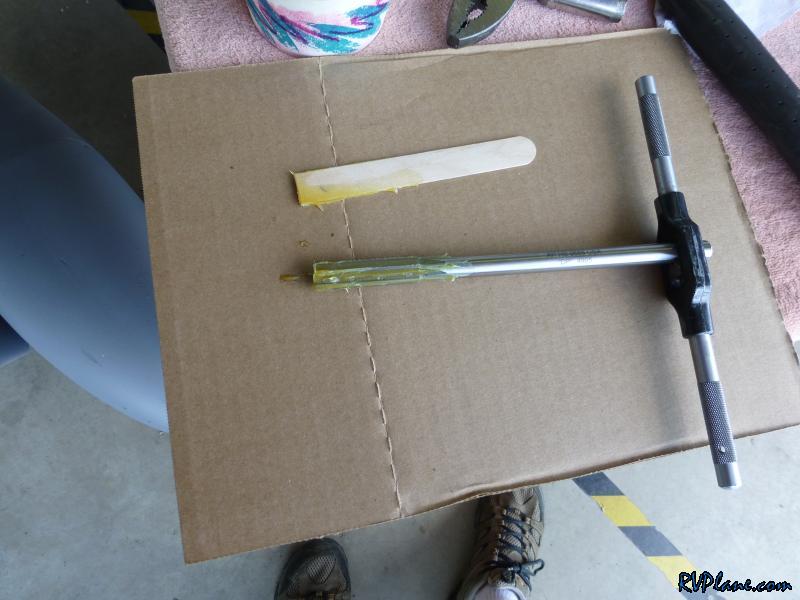
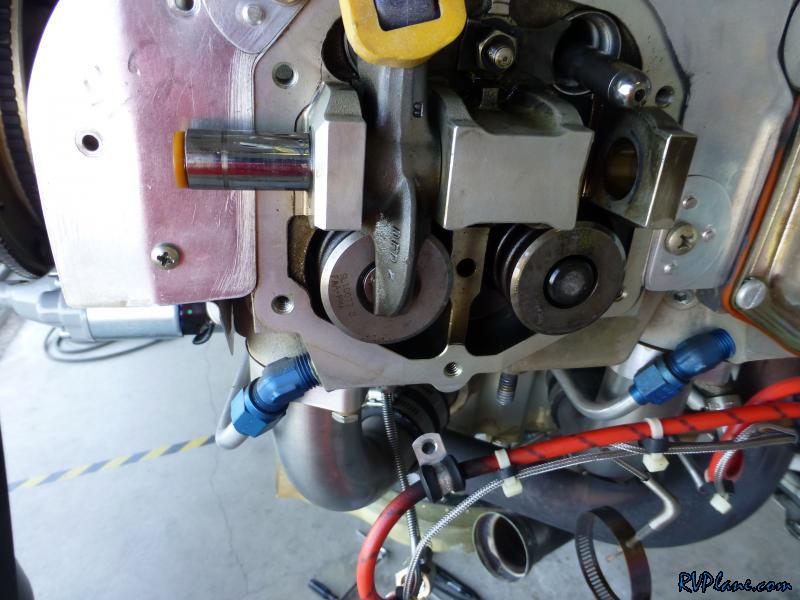
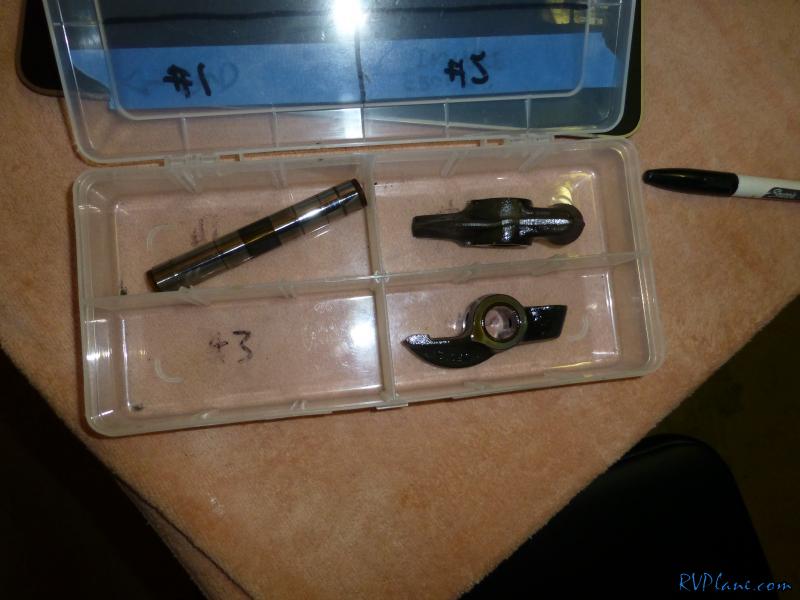
Next up was compressing the exhaust valve spring and removing the keys which hold the valve stem to the top of the springs. There are a number of Lycoming valve spring compressors on the market for $60-$150, but from the looks of the pictures of them online, it looked like something I could easily fabricate. This would save me some money, but more importantly, buy me time as I could get the job done ASAP, instead of waiting for a tool to ship.
I ended up purchasing two pry-bars (Stanley 55-515 12-3/4-inch Wonderbar Pry Bar - p/n 1-55-515 - $12 @ Ace and a Kobalt 7-in Pry Bar - Item #: 117699 / Model #: 62897 - $6 @ Lowes). It took about an hour using the angle grinder to get the shape just right, but it worked flawlessly! I wrapped the tool in electrical tape in order to prevent any scratches on the engine pieces.
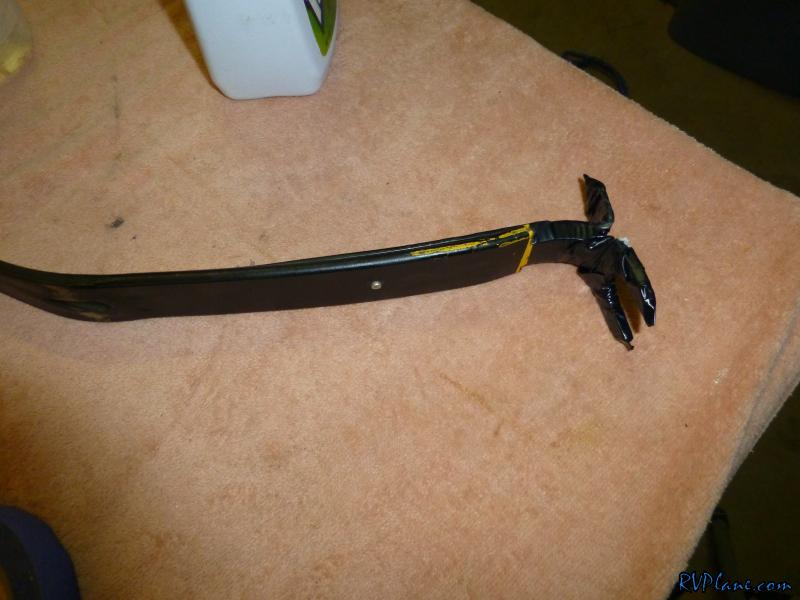
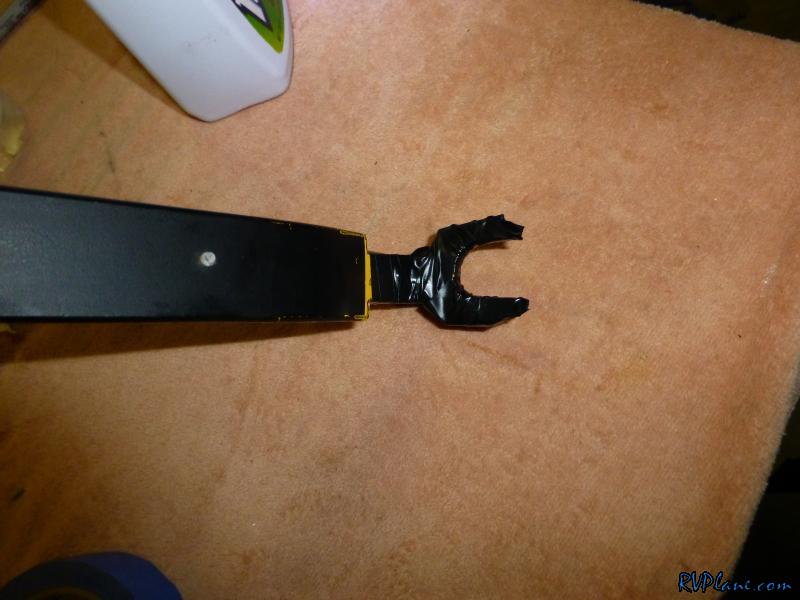
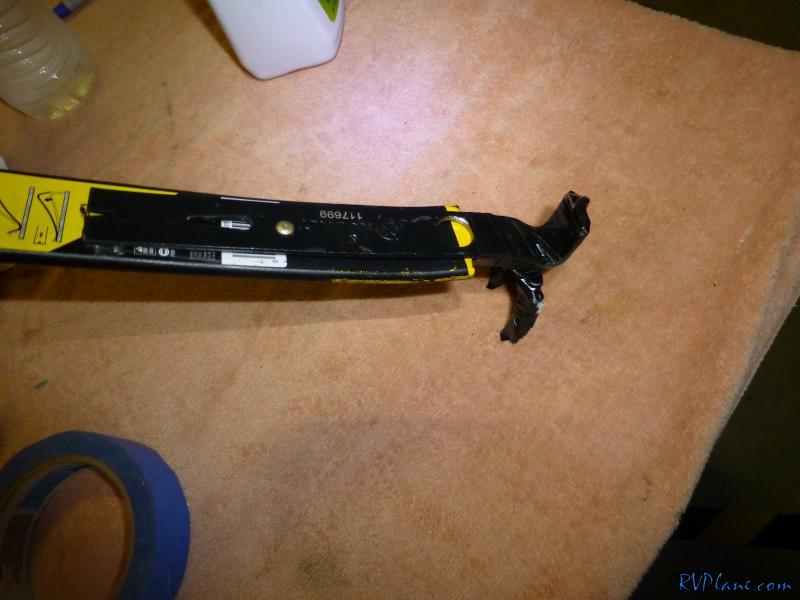
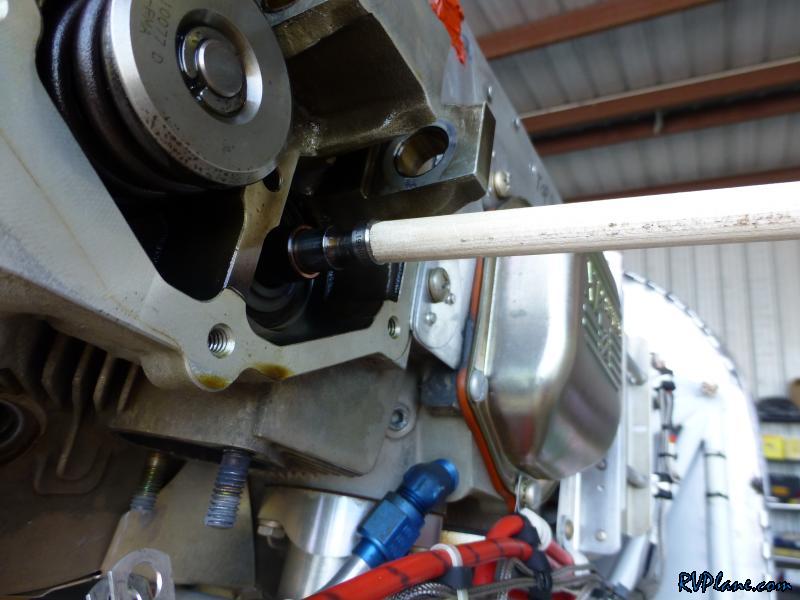
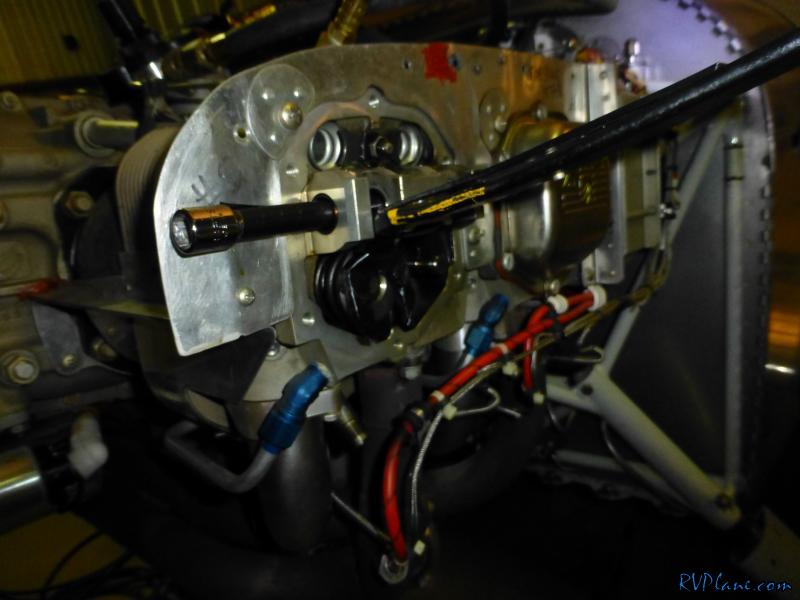
A poor picture of the took in action. I put a 3/8" socket extension through the holes of the rocker shaft for the valve compressor tool to attach to. Pushing down on the tool compressed the valves enough to get the locking keys out.
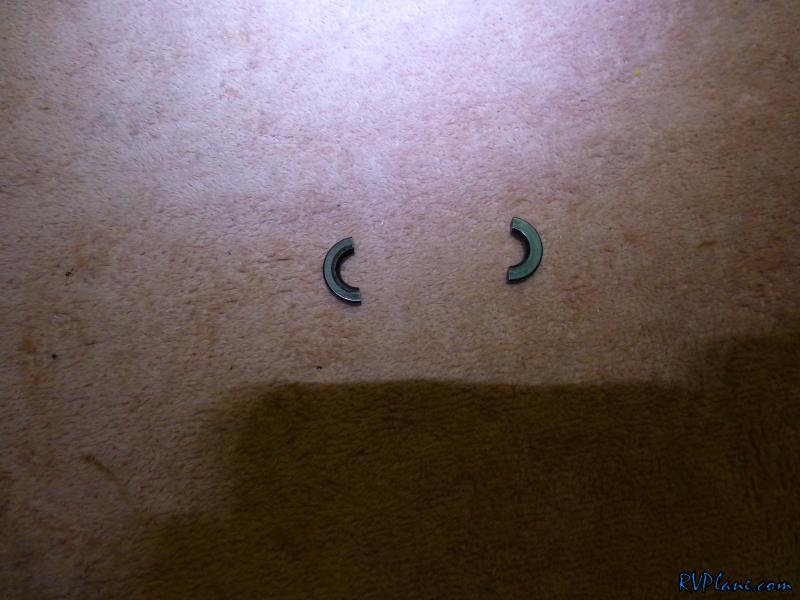
After using a dental pick with the spring compressed, the keys holding the top of the valve springs to the valve stem came out.
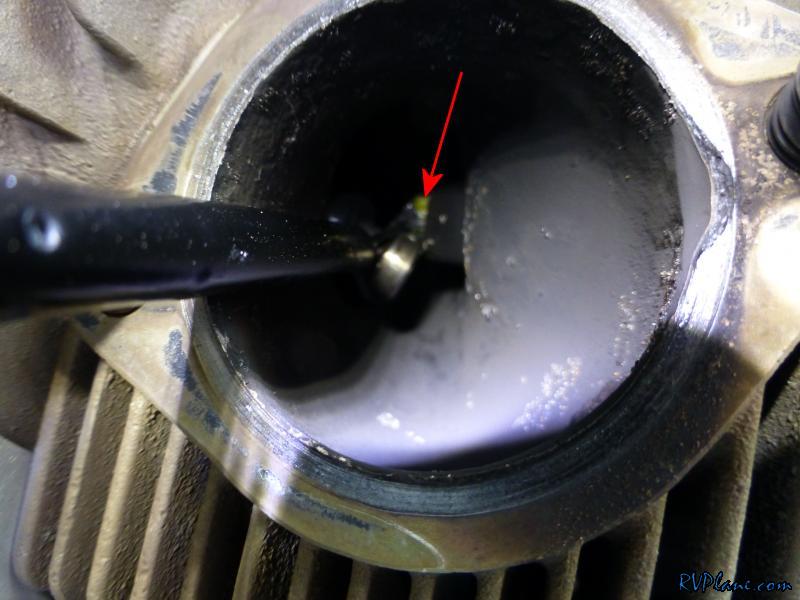
Now, the moment I have been waiting for - is the exhaust valve sticking, or is there something else going on with my engine.
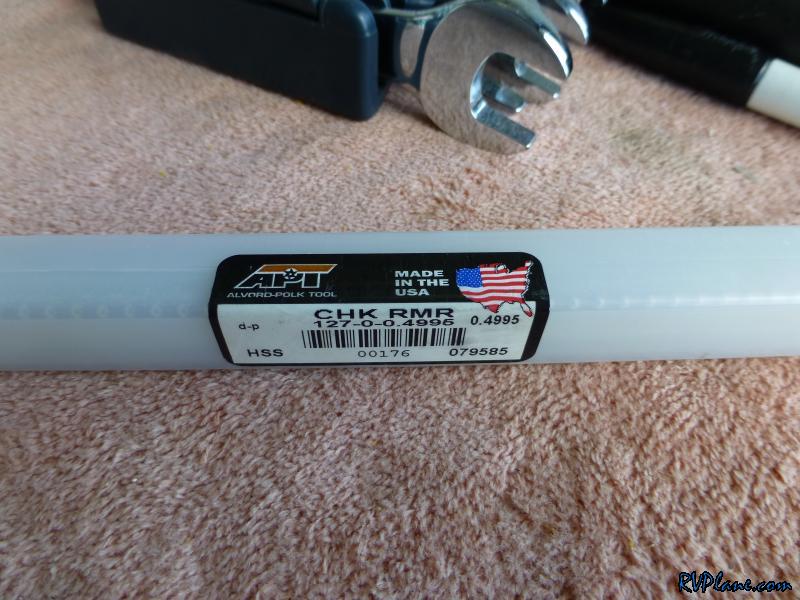
Within about 0.000001 seconds of touching the exhaust valve stem, it was very clear what my issue was - sticky valve! The valve stem was very very tight in the valve guide. I could not spin the valve. I could not wobble it. I could barely push it into the cylinder. I called up Daryl at Superior and let him know what my issue was. His recommendation was to purchase a 0.4995" reamer and clean out the valve guide.
A 0.4995" reamer is on it's way ($25 shipped via Ebay), and I should hopefully have this fixed by the weekend. More pictures to follow of the process.
Loss of #2 cylinder
Loss of #2 cylinder
Last edited by bullojm1 on Wed Aug 12, 2015 4:03 pm, edited 1 time in total.
Mike Bullock
http://www.rvplane.com
RV-7 | Superior IO-360 | Whirlwind 200RV
Garmin GTN650 | GRT Dual Sport SX EFIS
Status: FLYING!
http://www.rvplane.com
RV-7 | Superior IO-360 | Whirlwind 200RV
Garmin GTN650 | GRT Dual Sport SX EFIS
Status: FLYING!
Sorry about your latest woos but what a great write up to enlighten us all.
Good luck on your repairs.
RV-7 N71SW reserved
Started on 10/8/2013
Working on Fuselage as of 5/10/15 95%done
started finish kit on 7/1/16
engine on order from Barett.Will be shown at their EAA booth and then delivered to us after show
Started on 10/8/2013
Working on Fuselage as of 5/10/15 95%done
started finish kit on 7/1/16
engine on order from Barett.Will be shown at their EAA booth and then delivered to us after show
- captain_john
- Sparky
- Posts: 5880
- Joined: Sun Oct 31, 2004 9:17 am
- Location: KPYM
CJ - Good to see you as always! I'm glad I could teach you a thing or two about the beer smuggling machine the RV can be!captain_john wrote: Great to see you last weekend and thanks for the boat trip!
Mike Bullock
http://www.rvplane.com
RV-7 | Superior IO-360 | Whirlwind 200RV
Garmin GTN650 | GRT Dual Sport SX EFIS
Status: FLYING!
http://www.rvplane.com
RV-7 | Superior IO-360 | Whirlwind 200RV
Garmin GTN650 | GRT Dual Sport SX EFIS
Status: FLYING!
Today was the day to fix my sticky #2 exhaust valve. After doing some research, it seemed to make sense to drop the exhaust to get access to the exhaust port on the #2 cylinder.
It's not much access, but it's enough to be able to grab the exhaust stem once it is out of the guide.
I used a 7/16 wooden dowel to use a hammed against to push the valve into the cylinder.
It's tough to see, but I used a set of mechanical pickup jaws to grab the step of the exhaust valve once it exited the guide.
This tool is amazing - the jaws have a fantastic amount of strength, and there is a built in LED light at the end of the tool. For $8, it's a bargain.
I bought this 0.4995 reamer off of EBay for around $25 shipped. The total cost to fix this issue is under $50! I'm thrilled with this!.
I chucked the reamer into my tap-and-die tool and added a fair amount of Aeroshell #5 wheel bearing grease. The grease not only lubricates the reamer, but it also catches any shavings the reamer removed from the guide.
Rotating clockwise, the reamer is fully inserted into the guide.
I only went in as far as I needed to with the reamer.
Pulling the reamer out revealed some interesting black gook it removed from the guide.
Next was cleaning any shavings out of the valve guide. I inserted a rag into the exhaust port, and then sprayed carb cleaner down the exhaust valve guide.
Next up was the fun task of getting the valve back into the guide. I used a telescoping magnet down the valve guide to attach to the valve stem. However, the valve needed to be lifted in the cylinder to line up properly with the guide. This modified Popsicle stick did the job. It took about 5 minutes to get the valve back in the guide.
The valve now moves effortlessly in the guide. I consider this issue fixed!
Next up was getting everything back together. I re-inserted the rope into the cylinder to keep the exhaust valve closed while I installed the keys.
A few moment later, the two keys to the exhaust valve are installed.
And then the cap.
This is where I lost a little momentum. I had a hard time getting the rocker arms compressed enough for the rocker shaft to be pushed through the arms. It was almost like the pushrods grew longer by a few mills. After doing some research, it seems this is caused by the tappets/cam followers (aka hydraulic lifters) filling with oil and expanding, making the pushrods seem longer.
There were three possible solutions I read on how to overcome this:
1) Remove the pushrods and shroud tubes, remove the hydraulic lifters and bleed the oil out of them with a toothpick.
2) Apply some force to the pushrods for a few minutes - this will cause oil to be bled from the lifters.
3) Use a valve spring compressor to compress the springs on the valve enough for the rocker shaft to fit into the rocker arms.
For the intake valve, I was able to place an Irwin clamp to apply a slight amount of force to the pushrods. This worked great.
Success! The shaft is through the intake rocker arm.
Unfortunately the Irwin clamp trick did not work on the exhaust side. One issue was the baffle material got too tall and the clamp didn't have much to grab onto. I did not have a proper spring compressor, nor did I want to remove the shroud tubes for the exhaust pushrod. The last option was to find a way to compress the hydraulic lifter by applying a force to the pushrod.
After battling with different ideas for over an hour (very long frustrating hour, I might add), I came up with the idea to allow the engine to do the work. Although the rocker shaft was too big to insert, I thought I could insert a 1/2" wood dowel, and then rotate the propeller so the camshaft would push on the exhaust pushrod, applying pressure to the exhaust valve spring, and compressing the hydraulic lifter in the process. This worked amazingly well! Within one minute, the lift was compressed enough to allow the rocker shaft to be inserted into the rocker arm!
The rocket shaft is in place, and the job is done!
I did go around to the other 3 cylinders to make sure the exhaust valve was not sticking. Good news was no other exhaust valve seemed to have any major friction with the guide. I buttoned everything up and went for a successful 0.7 hour test fight. It's great to have the RV back in service, and I learned a TON about how the topend of this engine works.
Mike Bullock
http://www.rvplane.com
RV-7 | Superior IO-360 | Whirlwind 200RV
Garmin GTN650 | GRT Dual Sport SX EFIS
Status: FLYING!
http://www.rvplane.com
RV-7 | Superior IO-360 | Whirlwind 200RV
Garmin GTN650 | GRT Dual Sport SX EFIS
Status: FLYING!
Nice job! I was wondering if any of the other valves were sticking. Glad they are OK. So what causes something like an isolated stuck valve?
Bruce Hill
RV-9A N5771H flying over 1100 hours!
Build Log at http://www.overthehills.com/RV-9A-Project
Blog at https://flyingoverthehills.wordpress.com/
EAA Tech Counselor, A&P
RV-9A N5771H flying over 1100 hours!
Build Log at http://www.overthehills.com/RV-9A-Project
Blog at https://flyingoverthehills.wordpress.com/
EAA Tech Counselor, A&P
Someone on VansAirForce pointed out I clearly had a piece of the exhaust flange missing on the bottom of my cylinder (on the right, next the stud and exhaust port)
I called up Superior and spoke with Daryl who took a look at my picture. He said this isn't a big deal, and the proper fix would be to use some 75118 copper gaskets along with some high temperature RTV to make sure there isn't any leaking. Some new gaskets are on their way!
Mike Bullock
http://www.rvplane.com
RV-7 | Superior IO-360 | Whirlwind 200RV
Garmin GTN650 | GRT Dual Sport SX EFIS
Status: FLYING!
http://www.rvplane.com
RV-7 | Superior IO-360 | Whirlwind 200RV
Garmin GTN650 | GRT Dual Sport SX EFIS
Status: FLYING!