Ive been studying how to cut circular and rectangular holes for my RV7A tip up panel.
The two methods Im looking at are the brute force and cad/cam methods.
The brute force method basically involves drawing actual size holes on the panel then cutting. I ordered a DVD from some guys in Wisconsin that showed a 3-1/8", 2-1/2 "hole punch out die" for the round and a utility knife- like tool with a carbide tooth tip for the rectangular, used by pulling along a straight edge several times like a scribe (Olfa P800?) The problem is the hole die is $155 and I cant find this utility knife anywhere. This would be my preferred method.
The CAD/CAM method involves finding the right autocad program, installing it, learning to use it, applying the right size holes for my selected instruments, which Im not sure where to find, then taking the CAD file to a local water jet company (which I do have in mind) using the right file format (.dwg?) This could work really sweet if I want to go through the learning curve. I am mostly computer literate....just never done CAD
I see some discussions here in bits and pieces on the subject of panel cutting, but never a whole tutorial. Any suggestions?
Tim
Panel design and cut outs
I used a jigsaw, fly cutter, and a file. Cheap and it is very rewarding once completed.
You won't need CAD/CAM software, just CAD. The waterjet guy will use his CAM software to generate the G-Code for the machine.
DXF is what most waterjeters want to see for a drawing file. Also, use the snap functions of the CAD program to ensure all the lines are contiguous, don't overlap, hang over etc. This causes problems running the file on the machine.
Waterjeted panels are great but I did not want to spend the cash to get it done when I could cut it myself.
I printed the CAD file full size and used that for a template to layout the cuts on my panel.
Brantel (Brian Chesteen),
RV12-IS, #121606, N912BC - Building Now!
RV10, #41942, N????? - Project Sold
RV-7/TU, #72823, N159SB - SOLD
RV12-IS, #121606, N912BC - Building Now!
RV10, #41942, N????? - Project Sold
RV-7/TU, #72823, N159SB - SOLD

Hey Tim-
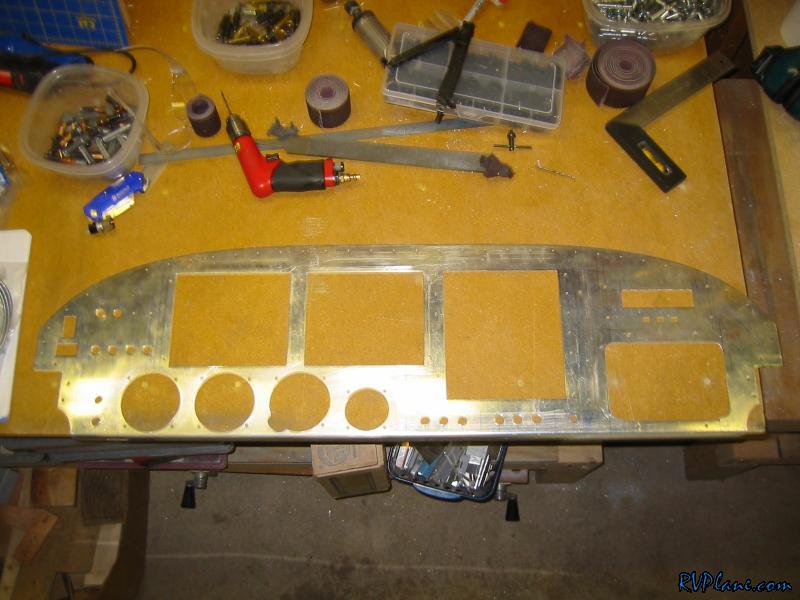
I cut my panel using the old school hand-tools method also. What I did was lay everything out originally with full sized instrument printouts. Once I found a good combination, I broke out the sharpie and made my markings for the rectangular holes and the center and sides of the circular hole.
For cutting the holes, I used a jigsaw as well with a high tooth-count bi-metal blade. My original cuts were about 1/32 - 1/16" from my lines. I used a file to get it down the rest of the way.
For the circular holes I used a punch. I know they are expensive, but they made a perfect hole. I also have a fly cutter (from sears) that I have used for lightening holes for the rest of the project. The problem I have had with the fly cutter is it tends to walk slightly when going through thick metal. That is fine for a lightening hole, but if your hole is a little oblong, it will really show when you put a perfectly round instrument in it.
My recommendation for the round holes is to bite the bullet and buy the hole punches from Avery. Once you are done with them, sell them on one of the forums. Sure, you will lose a little money (maybe $20-40, depending on what kind of a salesman you are!), but that is money well spent. Also you might want to check with your local EAA chapter. That's how I found the punch I used.
Just to give you a little tease, here is my panel and how it turned out:
Good Luck!
Mike Bullock
http://www.rvplane.com
RV-7 | Superior IO-360 | Whirlwind 200RV
Garmin GTN650 | GRT Dual Sport SX EFIS
Status: FLYING!
http://www.rvplane.com
RV-7 | Superior IO-360 | Whirlwind 200RV
Garmin GTN650 | GRT Dual Sport SX EFIS
Status: FLYING!
Mike
I agree with you on the old fashioned method of drawing and cutting with a jigsaw. Over the course of the day, I am concluding that a jigsaw is just fine, per Brantel and yourself. I spoke to the big man at Avery earlier this afternoon; he tells me he will rent the hole punch for $30 for for 4 days (might include the screw template.) This is about the same as buying, using and reselling for a small loss, I think. So....I think I have a plan....still open to ideas. Tim
I agree with you on the old fashioned method of drawing and cutting with a jigsaw. Over the course of the day, I am concluding that a jigsaw is just fine, per Brantel and yourself. I spoke to the big man at Avery earlier this afternoon; he tells me he will rent the hole punch for $30 for for 4 days (might include the screw template.) This is about the same as buying, using and reselling for a small loss, I think. So....I think I have a plan....still open to ideas. Tim
Last edited by timotb on Wed Jun 03, 2009 7:50 am, edited 1 time in total.


I agree with Brian
Tim,
I used a flycutter for the large round holes, a step drill for the switch holes and a sabre saw for the rectangular radio stack hole. Before cutting anything, I made an Autocad layout of the panel with the hole centers. Once the centers and diameters are known, drilling them with a flycutter and drill press is pretty simple but noisy. The flycutter and electric hand drill were also necessary when I added an autopilot and an ADI to the panel after original panel completion. I added these a couple of years after the plane was flying.
Good luck and congrats on getting to the panel construction stage.
Try Ebay
You can try Ebay for the punches.
I bought a 2 1/4 for 35$, but don't be in a hurry.
I also found a 1" and a 1 1/8" for only a few bucks.
Search for Greenlee punch or knockout punch.
I bought a 2 1/4 for 35$, but don't be in a hurry.
I also found a 1" and a 1 1/8" for only a few bucks.
Search for Greenlee punch or knockout punch.
here is another concern.....cutting the radio stack height. The width of each radio is easy, but what about the cumulative height of four radios? Simply add all the individual heights? What about extra for any trim around each radio?
Maybe Im over thinking this issue in advance. It might be more obvious when I have all the radios
Maybe Im over thinking this issue in advance. It might be more obvious when I have all the radios
Tim,timotb wrote:here is another concern.....cutting the radio stack height. The width of each radio is easy, but what about the cumulative height of four radios? Simply add all the individual heights? What about extra for any trim around each radio?
Maybe Im over thinking this issue in advance. It might be more obvious when I have all the radios
I waited until I had all my radios to cut my stack height, and I am glad I did. The way the different trays aligned with each other made my stack a little shorter (1/16") than the cumulative heights from the product manuals.
Mike Bullock
http://www.rvplane.com
RV-7 | Superior IO-360 | Whirlwind 200RV
Garmin GTN650 | GRT Dual Sport SX EFIS
Status: FLYING!
http://www.rvplane.com
RV-7 | Superior IO-360 | Whirlwind 200RV
Garmin GTN650 | GRT Dual Sport SX EFIS
Status: FLYING!